Working Way to Add Special Effects to a Video

Overview

There are some situations that we need to add special effects to a video. When a video is too dark, you need to adjust it’s brightness. Adjust contrast can also make a video more sharp. To make a video more beautiful, you can also adjust its saturation.

If you’re a journalist, blogger, meme creator, or 4chan poster, you probably need a lot more functionality than simple capping and cropping for a video. Polishing your videos with an easy to use video editor is necessary if you want to attract more users attention and get more rewards. That’s why we are going to talk about how to add special effects to a video. Just keep reading the following content of this article.

How to Add Special Effects to a Video

 Step 1 >> Choose an Easy to Use Video Editing Tool

Gilisoft Video Editor is recommended here, which is an all-in-one video editing tool. It can enable you add special effects to a video such as adjusting brightness and contrast of a video.

 Step 2 >> Download and Install

Download Gilisoft Video Editor from the button below.

how-tos-wiki-img

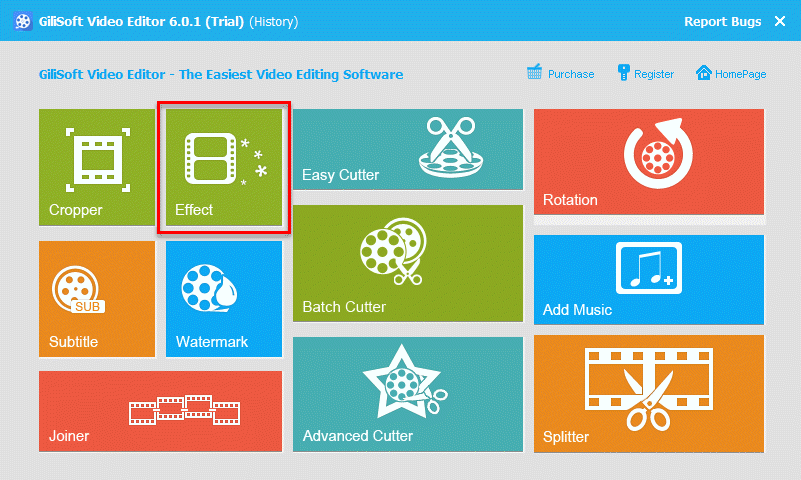
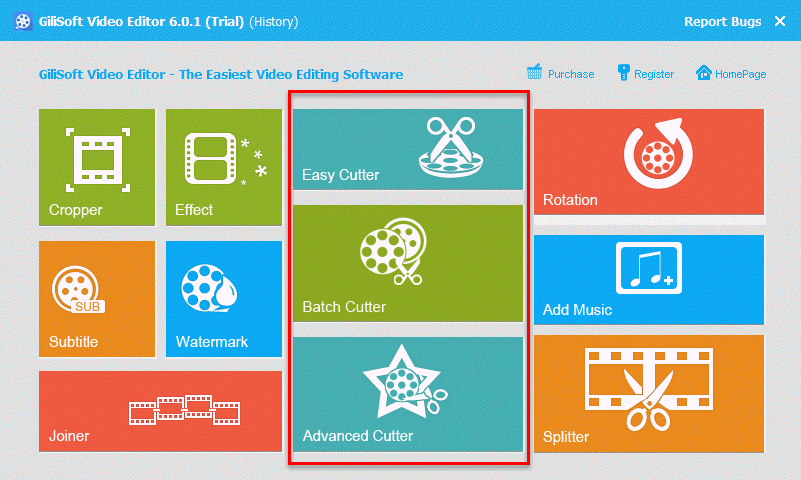
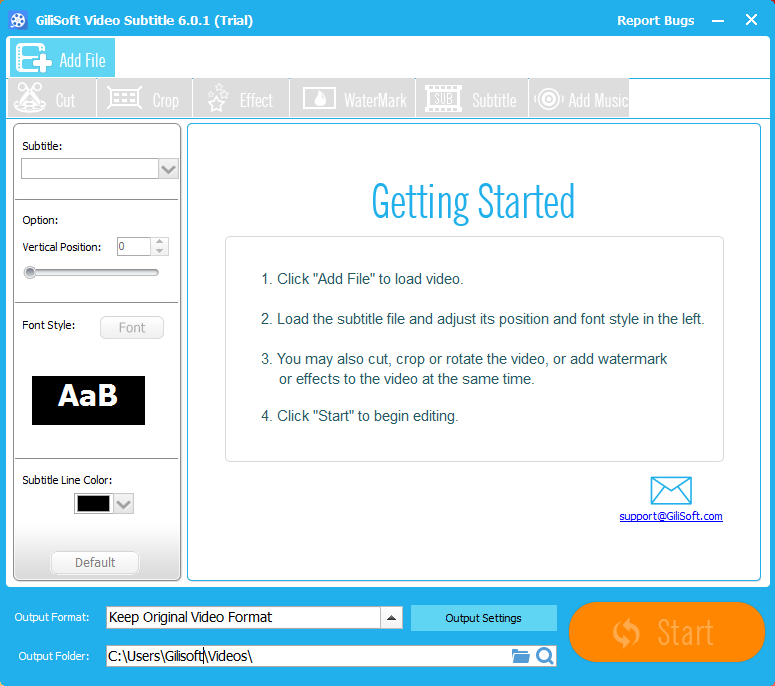
When downloading is complete, please run the setup file to install it by following its installation wizard. When installation is finished, run the program, you will see the following main screen of the video editor.

add-effects-to-videos

This is a powerful video editor. Besides adding special effects to a video It can also help you crop, split, cut, rotate, join videos and more.

 Step 3 >> Load Your Video Files

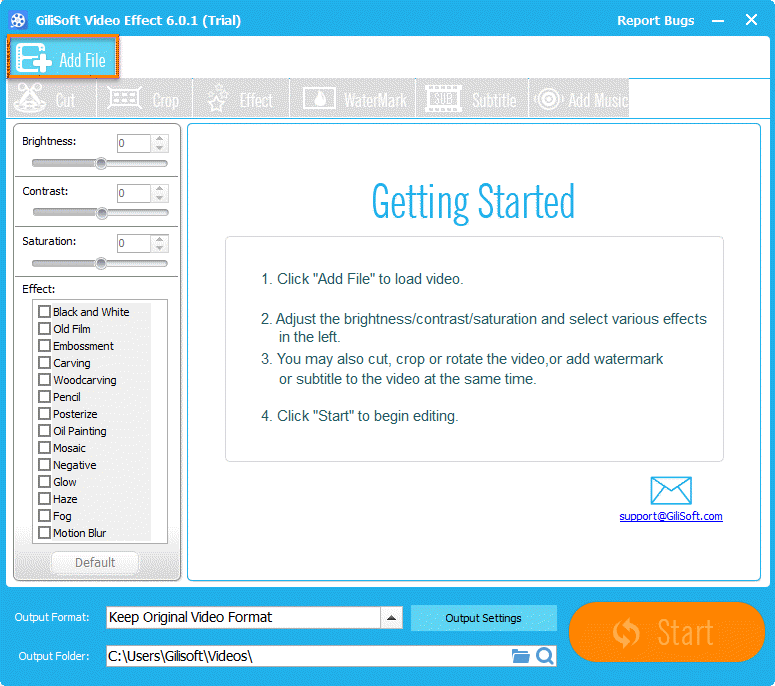
Choose the “Effects” module from the main screen. Click on “Add File” button to import your source video files.

add-file-to-add-effects
100+ file formats are supported by Gilisoft Video Editor. You can simply select most common used video formats like MOV/MP4/AVI/FLV from output format setting option. In order to satisfy your special needs, you can change the video quality and video frame size.

 Step 4 >> Add Effects to Your Video

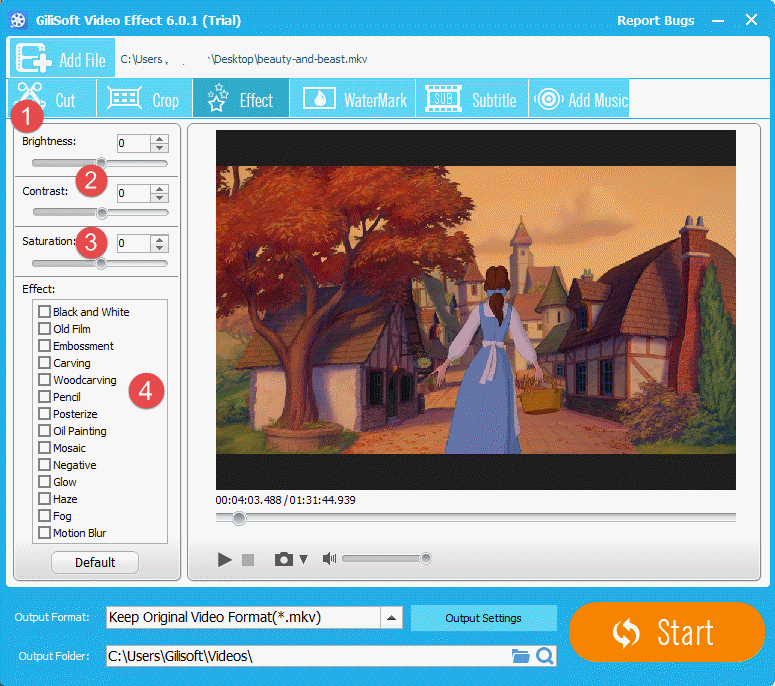
After successfully loading your video file, you can add special effects now according to your own requirements. There are four options that you can use to add special effects to your video. Look at the picture below.

add-effects

1. Adjust Brightness, if your original video is too dark.

2. Adjust Contrast to make your video more sharp.

3. Adjust Saturation to make your video more beautiful.

4. You can also add some pre-designed special effects to your video such as Black and White, Old Film, Embossment, Carving, Woodcarving, Pencil, Posterize, Oil Painting, Mosaic, Negative, Glow, Haze, Fog, and Motion Blur.

 Step 5 >> Start Converting Video to a New That Added Special Effects

When everything is prepared well, the last operation for you is clicking on the big “Start” button to convert video quickly. When completes, it will pop up a tips, and click on the “Open Output” to find your new video.

How to Cut Videos with Easy-to-use Video Editing Software

Overview

When you have a video and you want to share it to your families or friends, but you many only want to share a part of the video, how will you make the video part that you want to share? Another situation is that you have captured a movie with cellphone, but some scenes in the video were not good, so you want to cut them, how should you cut those unwanted parts? Let’s learn this lesson together in this article.

How to Cut off Unwanted Part of a Video

 Step 1 >> Choose an Easy to Use Video Cutting Tool

Gilisoft Video Editor is recommended here, which is an all-in-one video editing tool. It can enable you cut a large video into small clips no matter what video format is.

 Step 2 >> Download and Install

Download Gilisoft Video Editor from the button below.

how-tos-wiki-img

When downloading is complete, please run the setup file to install it by following its installation wizard. When installation is finished, run the program, you will see the following main screen of the video editor.

video-cutter

This is a powerful video editor. Besides video cutting feature, it also enables you crop, split, cut, rotate, and join videos and more.

 Step 3 >> Load Your Video Files

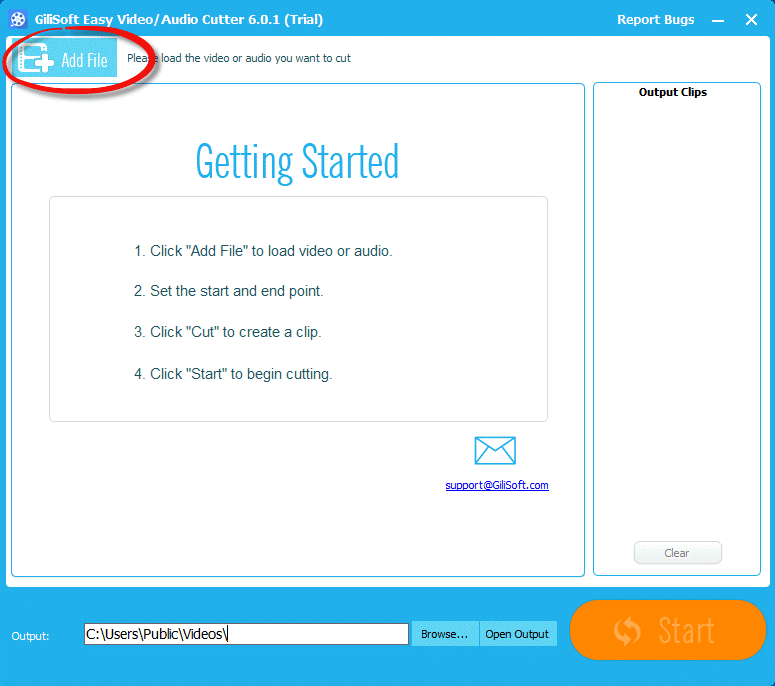
Choose the “Easy Cutter” module from the main screen. Click on “Add File” button to import your source video files.

add-vob-to-edit
100+ file formats are supported by Gilisoft Video Editor. You can simply select most common used video formats like MOV/MP4/AVI/FLV from output format setting option. In order to satisfy your special needs, you can change the video quality and video frame size.

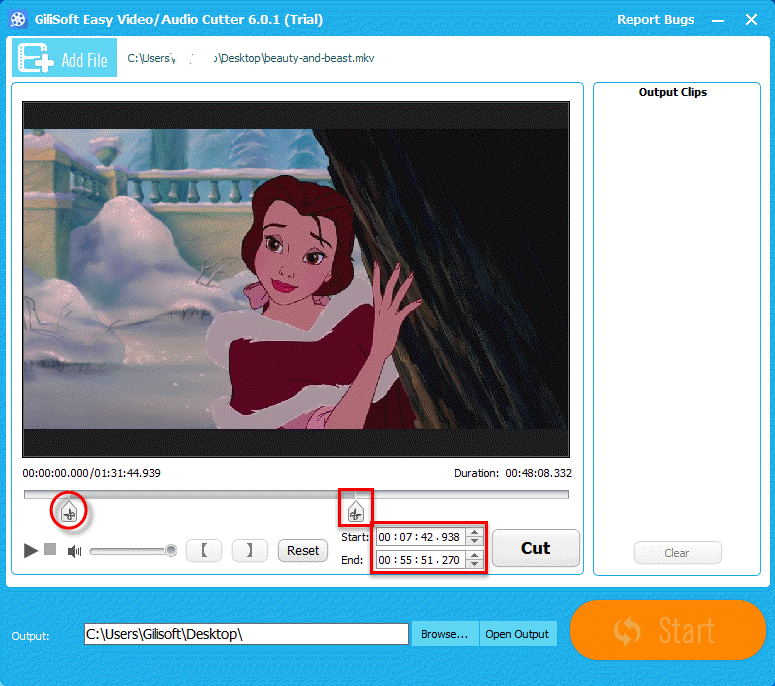
 Step 4 >> Set the “Start” and “End” Time of Cutting Part

You can drag two scissors icon to set beginning and ending scene, or you can enter the exact Start time and End time to get the clip.

video-cutter-1

 Step 5 >> Start Cutting Video

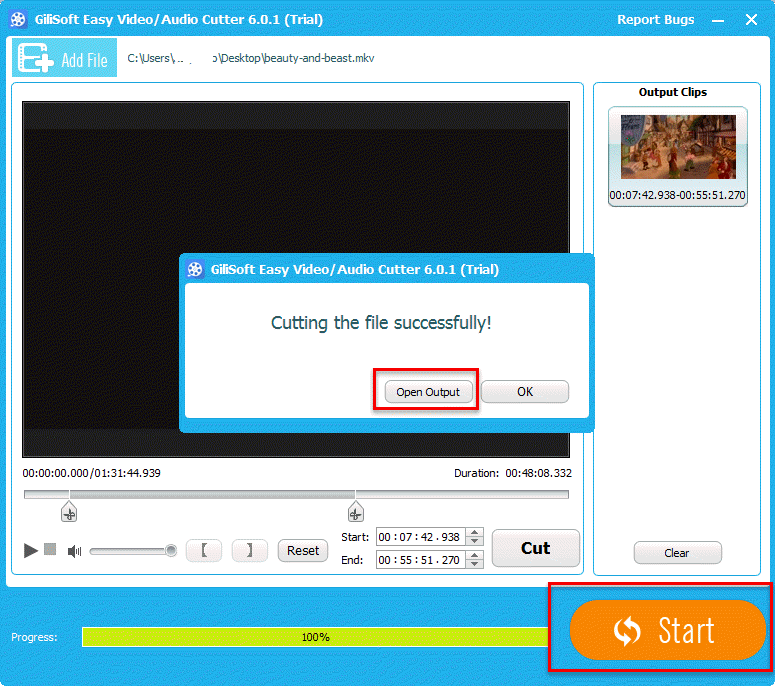
When everything is prepared well, the last operation for you is clicking on the big “Start” button to split video quickly. When completes, it will pop up a tips, and click on the “Open Output” to find your cut video clips.

cut-video-2

How to Rotate Videos with Video Editing Software

Overview

We always use cell phone or camcorder to capture videos, we usually call them home-made videos. When you play these videos on your computer, you may found these videos are rotated 90 degree. You may shot them in that way on purpose since you preferred portrait style to a landscape view. At this time, we need to find out a solution that can help us rotate these videos back to normal. So that we don’t need to strain our neck or flip the monitor on it’s side to watch these videos.

If you want to rotate a video, we will show you how to do that by the following contents.

The Tutorial of Rotating a Video (Any Format Video is Supported)

 Step 1 >> Choose an Easy to Use Video Rotating Tool

Gilisoft Video Editor is recommended here, which is an all-in-one video editing tool. It can enable you rotate video’s degree no matter what video formats are.

 Step 2 >> Download and Install

Download Gilisoft Video Editor from the button below.

how-tos-wiki-img

When downloading is complete, please run the setup file to install it by following its installation wizard. When installation is finished, run the program, you will see the following main screen of the video editor.

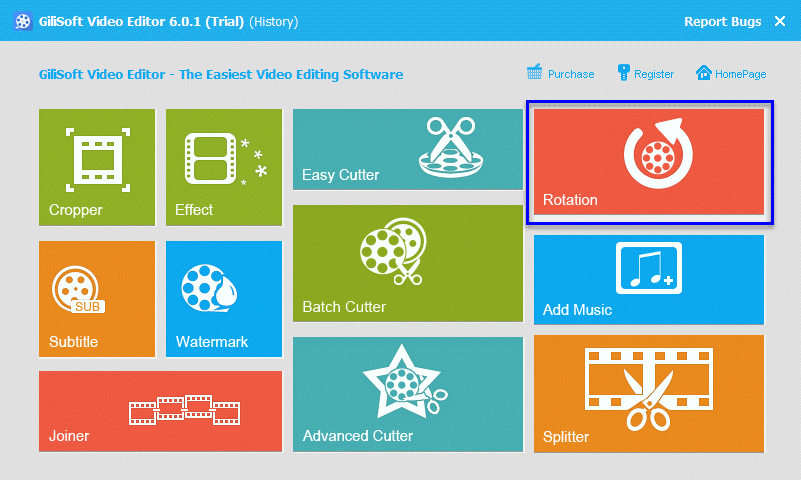
rotate-video-gilisoft-video-editor

This is a powerful video editor. Besides video rotating feature, it also enables you crop, cut, join, and split videos and more.

 Step 3 >> Load Your Video Files

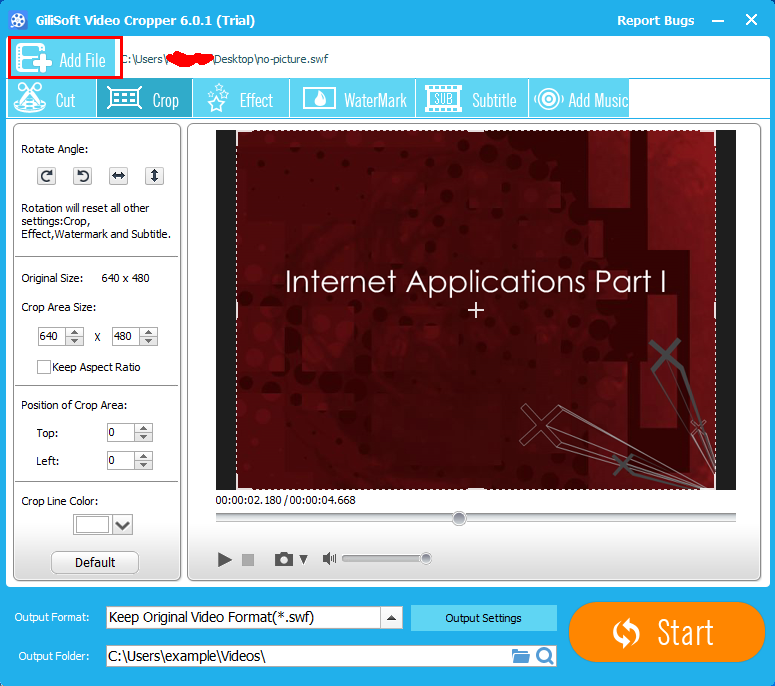
Choose the “Rotation” module from the main screen. Click on “Add File” button to import your source video files.

add-video-to-crop

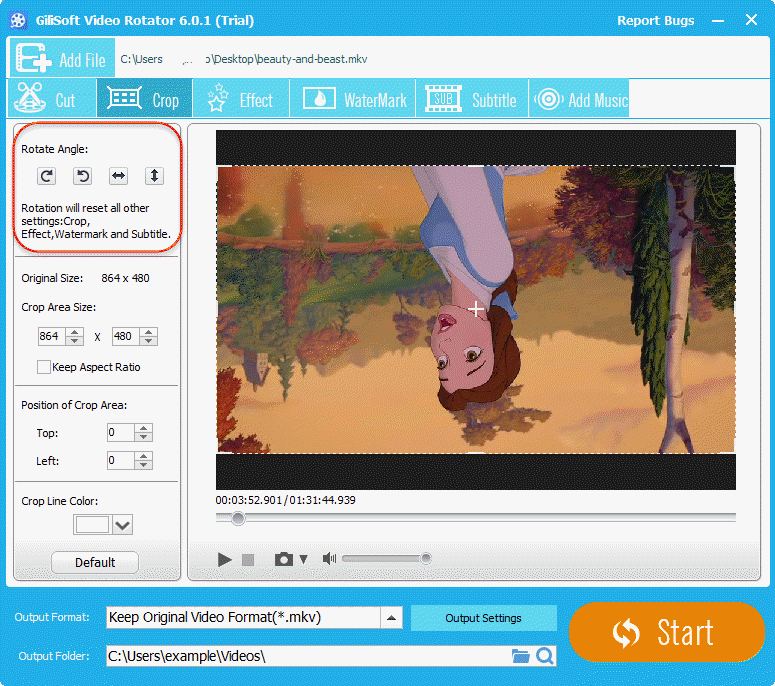
 Step 4 >> Rotate Your Video to Proper Degree

Select the one of the degree you want to rotate, you have several choice, rotate 90 degree, rotate 180 degree, rotate 270 degree.

rotate-video

 Step 5 >> Save Changes

When everything is prepared well, the last operation for you is clicking on the big “Start” button to rotate video quickly. When completes, it will pop up a tips, and click on the “Open Output” to find your joined videos. you can also review the video you rotate before converting, and you select the same video as original or other output format.


How to Split a Large Video into Small Parts/Clips

Overview

Do you have the requirement that splits a large video file into multiple parts? Or when you try to upload a video file onto YouTube, but you get failed because of maximum file size limitation. If you have encountered these problems we have stated before, that means you need to split your video into multiple parts/clips. But here comes a question, how to split a video into small clips in an easiest and fastest way? Let’s learn this lesson together in this article.

How to Split a Video into Small Parts/Clips

 Step 1 >> Choose an Easy to Use Video Splitting Tool

Gilisoft Video Editor is recommended here, which is an all-in-one video editing tool. It can enable you split a large video into small clips no matter what video format is.

 Step 2 >> Download and Install

Download Gilisoft Video Editor from the button below.

how-tos-wiki-img

When downloading is complete, please run the setup file to install it by following its installation wizard. When installation is finished, run the program, you will see the following main screen of the video editor.

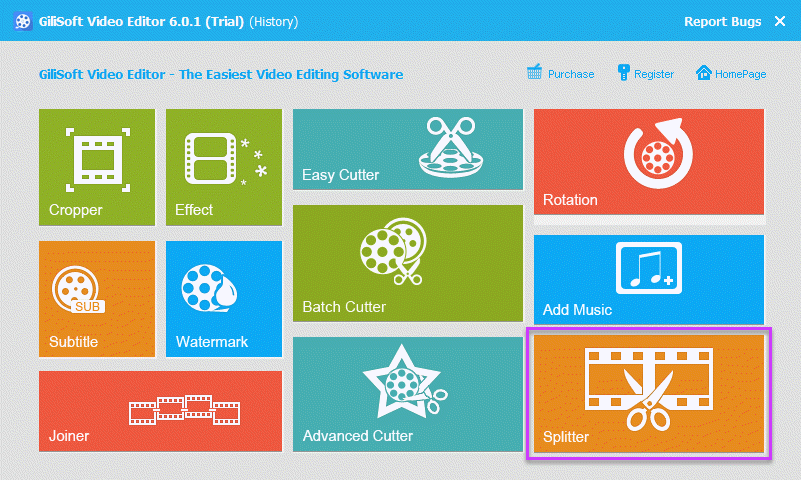
video-splitter

This is a powerful video editor. Besides video splitting feature, it also enables you crop, cut, rotate, and join videos and more.

 Step 3 >> Load Your Video Files

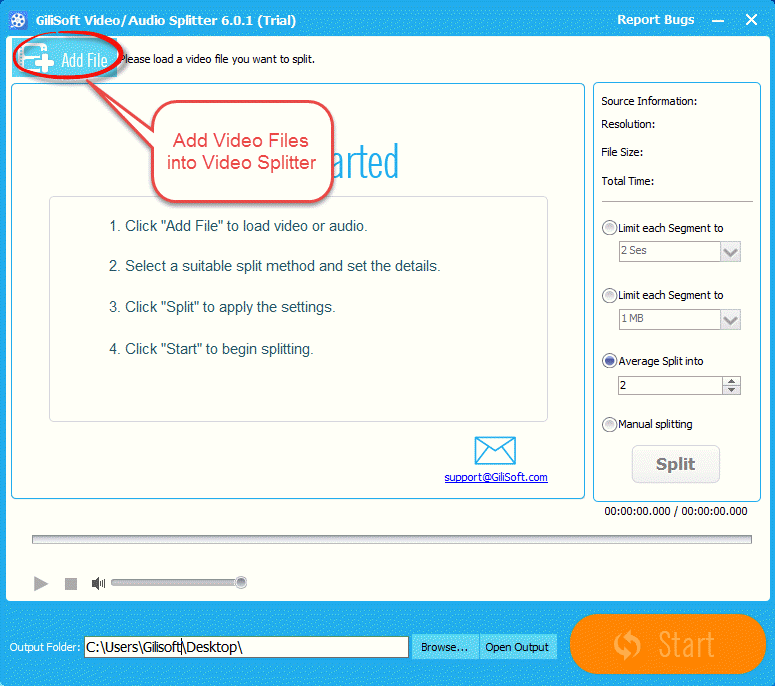
Choose the “Splitter” module from the main screen. Click on “Add File” button to import your source video files.

add-files-splitter

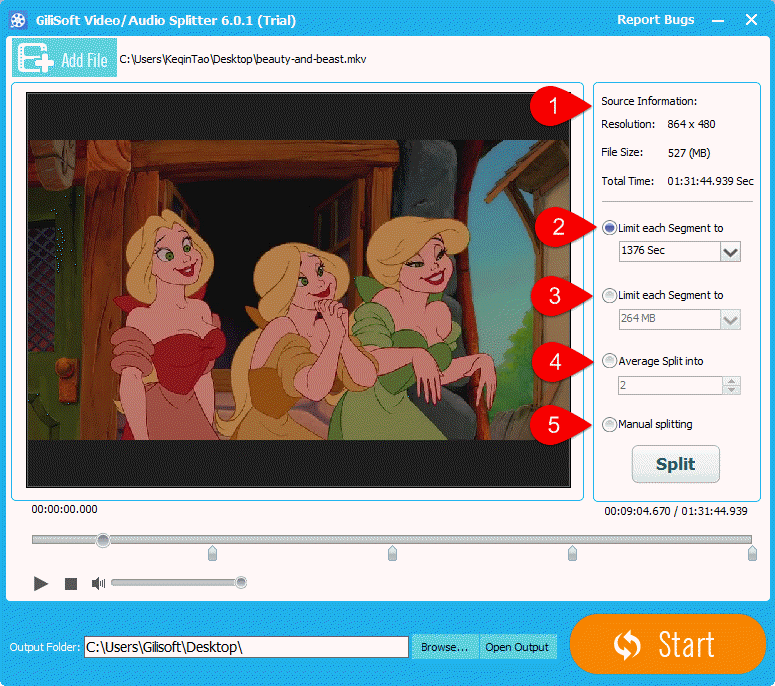
 Step 4 >> Set Your Splitting Properties

set-video-splitting

1. The original video information, including Resolution, File size and Total time.
2. Limit each segment to seconds, CD duration, DVD duration or manual enter the time.
3. Limit each segment to size in MB or manual enter the size.
4. Average split video to several segments.
5. Manual splitting mode to make the segments more useful.

 Step 5 >> Start Splitting Video Files

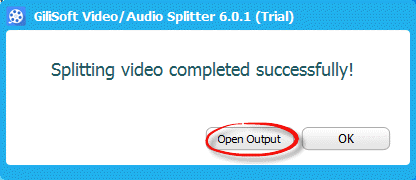
When everything is prepared well, the last operation for you is clicking on the big “Start” button to split video quickly. When completes, it will pop up a tips, and click on the “Open Output” to find your split video clips.

start-splitting-video

How to Join and Merge Several Videos into a Single Movie

Overview

We usually want to join cool videos into one to make a movie or extended video clip. Joining the desired video clips into one could make our life more joyful. And also we can share these creative videos to our families and friends via email, Facebook, Twitter and YouTube. But here comes a question, how to join videos in an easiest and fastest way? Let’s learn this lesson together in this article.

How to Join Video Files (Any Video Format)

 Step 1 >> Choose an Easy to Use Video Editing Tool

Gilisoft Video Editor is recommended here, which is an all-in-one video editing tool. It can enable you join multiple clips into one no matter what video formats are.

 Step 2 >> Download and Install

Download Gilisoft Video Editor from the button below.

how-tos-wiki-img

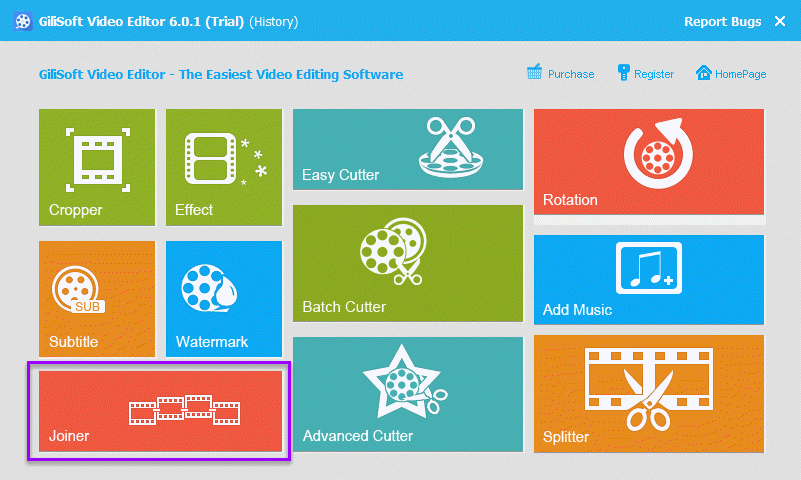
When downloading is complete, please run the setup file to install it by following its installation wizard. When installation is finished, run the program, you will see the following main screen of the video editor.

video-joiner

This is a powerful video editor. Besides video joining feature, it also enables you crop, cut, rotate, and split videos and more.

 Step 3 >> Load Your Video Files

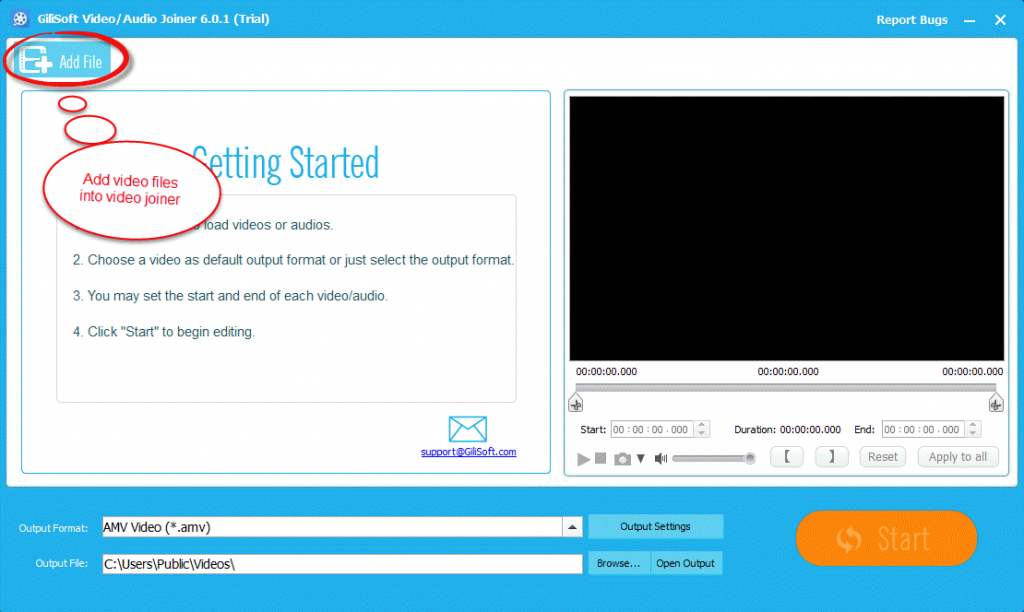
Choose the “Joiner” module from the main screen. Click on “Add File” button to import your source video files.

add-files-to-video-joiner

 Step 4 >> Set Output Format

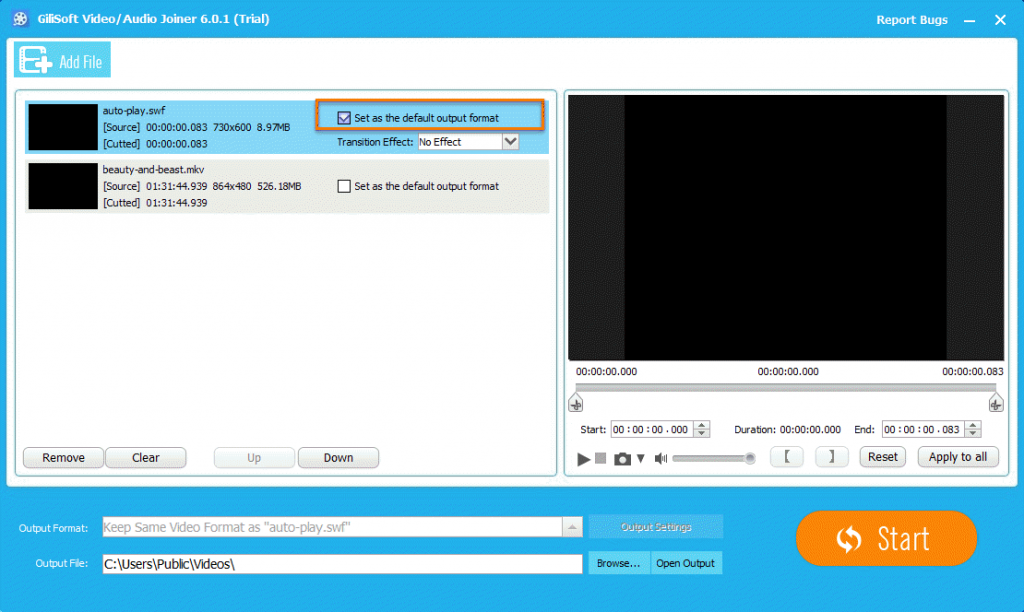
Option 1. Select one of the video clips and choose the “Set as the default output format” option. If you use this setting, the output format of your joining videos will be the original video format you have selected.

output-1

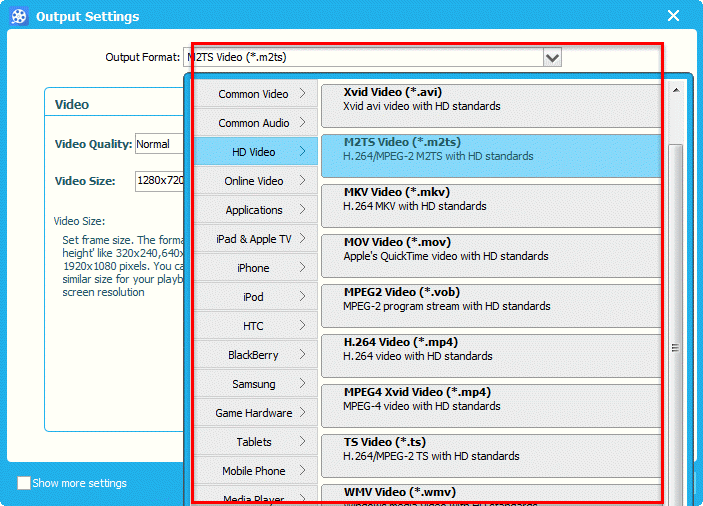
Option 2. Choose from output formats options. There are over 50 video file formats you can select to set as your default video file format such as AVI, MOV, VOB, MP4, MKV, MPG, WMV, and more.

output-2

 Step 5 >> Start Joining Videos

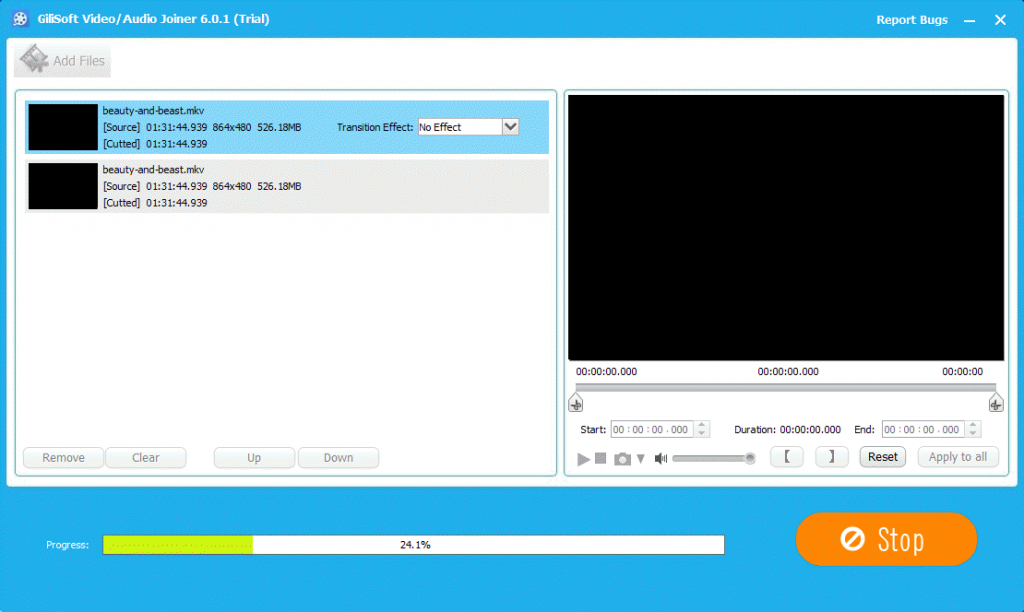
When everything is prepared well, the last operation for you is clicking on the big “Start” button to join video quickly. When completes, it will pop up a tips, and click on the “Open Output” to find your joined videos.

start-joining

How to Add Text and Picture Watermark to a Video File

Overview

How to protect your own copyright of a video/movie? It’s tried and true practice that is adding watermark to a video. It depends on your personal needs of adding types of watermark including website url, company/individual logo, and some special texts.

Here comes the question – how to add watermark to a video. Is it difficult? The following part will take you into a solution of adding watermark to a video without any trouble.

Make Preparation

Before jump right into the following steps, you need to download and install an easy-to-use video editor, which includes adding watermark function. Gilisoft Video Editor is highly recommended here since it’s notably simply and fast.

 Step 1 >> Download and Install

how-tos-wiki-img

Download the Gilisoft Video Editor from the button below. And then install it step by step according to its installer wizard. Once it’s successfully installed, just run it, and you will see the program window as shown in following picture.

video-editor-main

 Step 2 >> Load Your Source Video File

Select the “Watermark” module, and then click on the “Add File” button to import your source video file in which you want to add watermark.

add-file

 Step 3 >> Add Text or Picture Watermark to Your Video

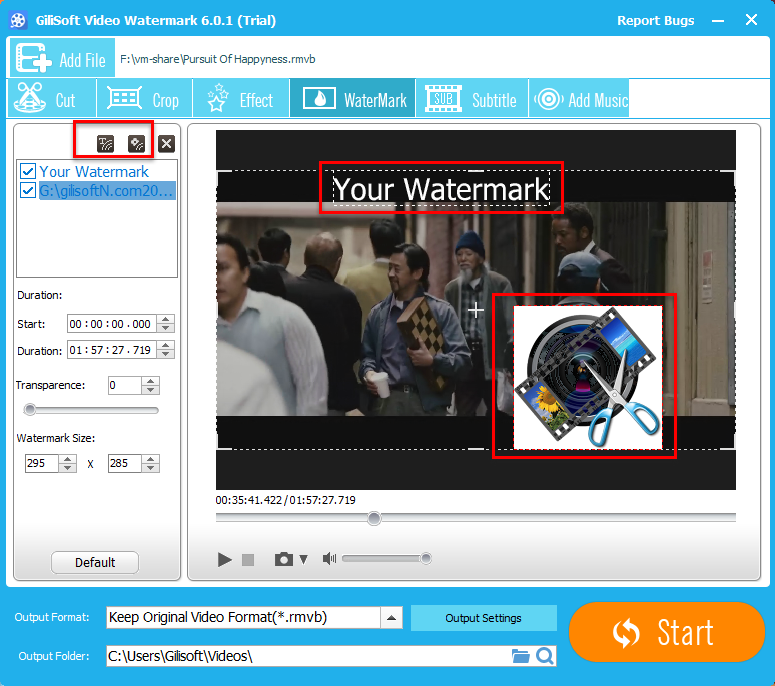
After loading your video file, you can add watermark now. And you can choose which type of watermark you are willing to add – Text and Picture. On the left side of the main program window, you can find two icons. One is used to add text watermark, the other is used to add picture watermark. Below is an sample of showing adding both text watermark and picture watermark.

add-watermark-to-video

More Options
1. Set duration of your watermark – you can decide where to add watermark to your video.
2. Adjust the transparency of your watermark – to better fulfill your requirements, you can change the transparency of a watermark.
3. Watermark size – you can set the size of a watermark.

 Step 4 >> Set Output Format

Gilisoft Video Editor is also a video converter software. That means you can change the output formats of your video during adding watermark process. There is no doubt that if you don’t want to change the output format, just keep it as original. Converting a video format is mainly suit for multiple devices needs.

set-output-format

 Step 5 >> Complete Adding Watermark

When everything is done, please click on the “Start” button to finish adding watermark to your target video.


How to Crop Video with Best Video Editing Software

Overview

It’s normal that when we got a video that there are black board or black bars on its edge. And it’s incompatible for a same video to playback on different device. In this case, we need to crop the video to cut a video with large dimension to a smaller size and resolution, so as to make it fit the screen of portable devices. Cropping a video could also satisfy our needs of removing unwanted portion of a video image so that we can better focus on certain area.

If you have a video or movie that need to be cropped, you are coming to right place. This post is aim to introduce you a powerful video cropper as well as provide you with a step by step tutorial of cropping a video.

Introduction of Video Cropper

Gilisoft Video Cropper is a powerful all-in-one video editor, which can crop all kinds of video files whatever it is in AVI, MP4, MKV, VOB, WMV, MOV, FLV, 3GP, SWF, OGV, WebM, RMVB, Apple ProRes, MXF, AVCHD, MTS, MOD, TOD, DV, MPEG-1, MPEG-2, DivX, Xvid, etc.

video-editor-main

With Gilisoft Video Editor, you can crop video as well as keep or change the video size, crop movie as well as keep or change the video format, and crop video as well as keep or change the video aspect ratio.

It doesn’t get much easier than this to cropping a video. And you can also use this video editor to trim video into several clips, add or remove subtitles for movie files, add effect or watermark to a video file, etc.

How to Crop Video with Video Editor

 Step 1 >> Download and Install

how-tos-wiki-img

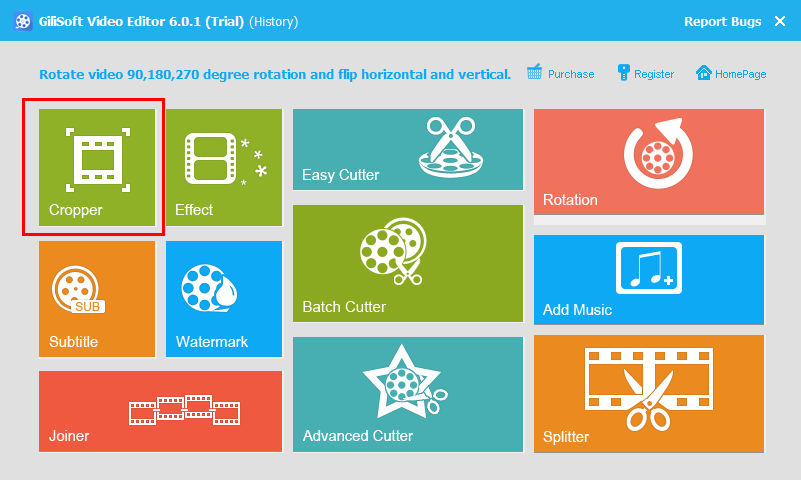
Free download Gilisoft Video Editor for Windows, install and run it, you will see the following main window of the program. And click on the “Cropper” module on the left.

video-cropper

 Step 2 >> Load Video Files You Want to Crop

Click on “Add File” button to load your video file. It supports a large number of video formats including MP4, AVI, WMV, MOV, ASF, FLV, WebM, OGV, WTV, MPG, MKV, VOB, MXF, AVCHD and etc. Or you can directly drag and drop your video file into the main window of Video Editor.

add-video-to-crop

 Step 3 >> Video Cropping Settings

Method 1: Crop video by adjust the cropping frame
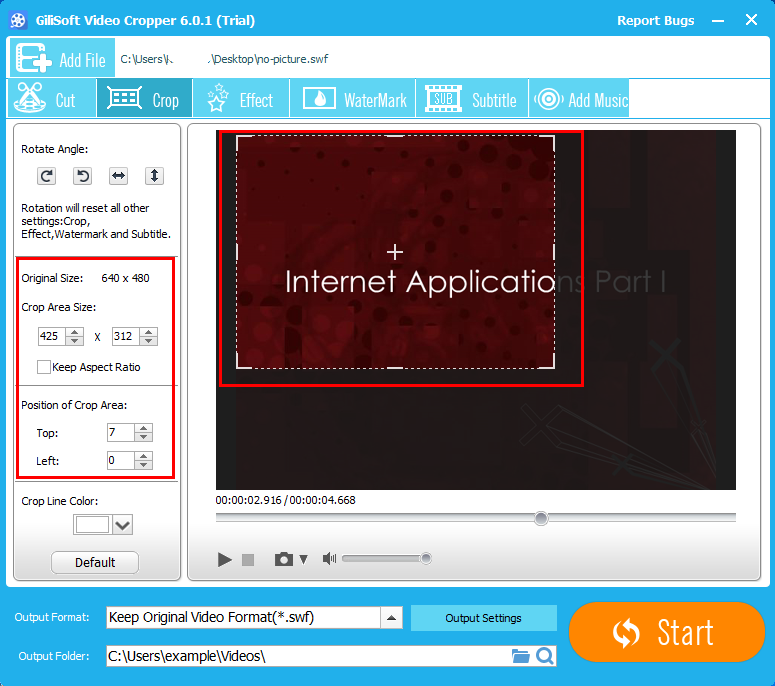
You can adjust the cropping frame (the dashed-line area) manually in the left Original Preview window while viewing the real-time effect.

Method 2: Crop video by setting the cropping values
You can input the exact value of “Crop Area Size”, “Position of Crop Area” on the left side of main window. You can set each value by typing in the number of pixels to be cropped in the text fields to crop your movie video, and the cropping frame will move accordingly.

video-crop-area

 Step 4 >> Set Output Format

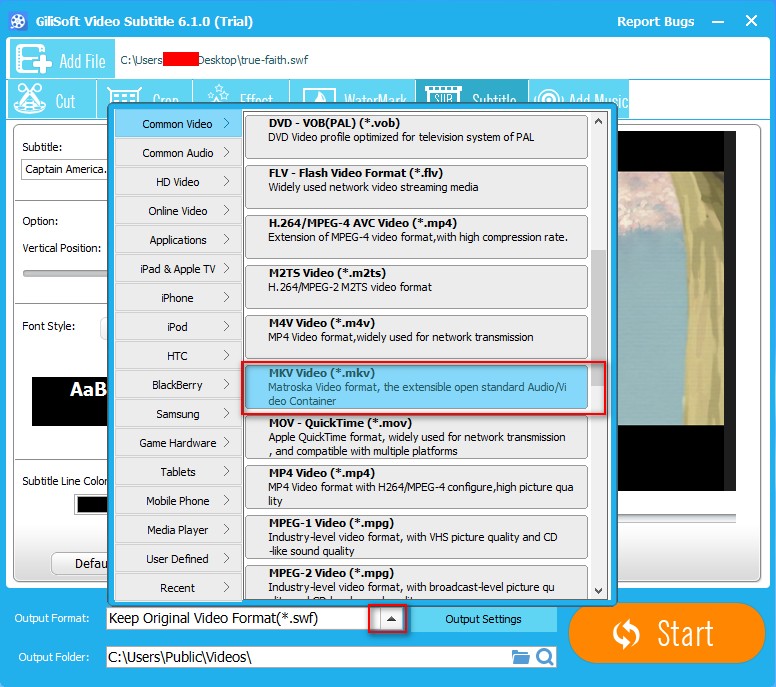
Click the little triangle drop down button to select preferable video format for the cropped video. You can select the same format as the original video or select a different format.

set-output-format

 Step 5 >> Finish Cropping Video

Click on the “Start” button to start and finish cropping your video to remove a black border around a video, to cut out the top and bottom of video image, to change the aspect ratio of the output video, to get a close-up of a subject of interest and etc.

How to Convert VOB Video to PowerPoint Compatible Video

Overview

We always fail to insert videos into PowerPoint presentations if the vidoes’ format is not supported by PowerPoint. The common supported video formats for PowerPoint on Windows are MPG, AVI, WMV, or ASF, and more compatible video format for PowerPoint on Mac are MP4 and MOV. You might be frustrated when you try to insert other video formats like VOB into PowerPoint. How to easily playback a video that is VOB format when inserting it into a PowerPoint presentation? Good expericence proves that converting VOB format video to a PowerPoint compatible format is the best solution.

How to Convert VOB to PowerPoint Compatible Format?

This post is aim to introduce a step by step guide on how to convert VOB to PowerPoint compatible video format like MPG. This guide is also applicable to convert other video formats like FLV, MKV, RMVB, MXF, AVCHD, Apple ProRes, MP4, MOV, TS, 3GP and etc to PowerPoint video format.

To Get Started, Please Download and Install Video Converting Software

Free download the powerful VOB to PowerPoint ConverterGilisoft Video Converter (for Windows), install and run it, the following interface will show up.

Gilisoft Video Converter is fairly easy to use. Besides converting VOB to PowerPoint video format, it also supports converting PowerPoint incompatible video formats like 3GP, FLV, F4V, OGV, WebM, WTV, DVR, MVI, MOD, TOD, MKV, TS, AVCHD, RMVB, MP4, MOV, DV and etc to PowerPoint supported format.

 Step 1 >> Import VOB Video

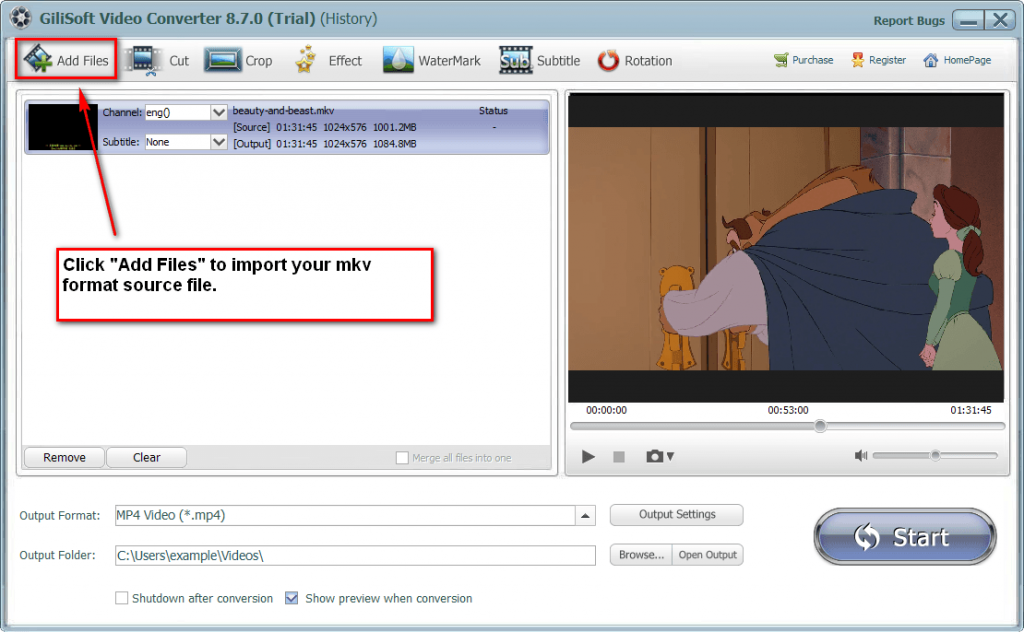
Click on “Add File” button to import the VOB video file which you need to convert. You can also simply drag and drop a source file into the main window of Video Converter to complete file importing.

add-mkv-file

 Step 2 >> Set/Choose PowerPoint Compatible Output Format

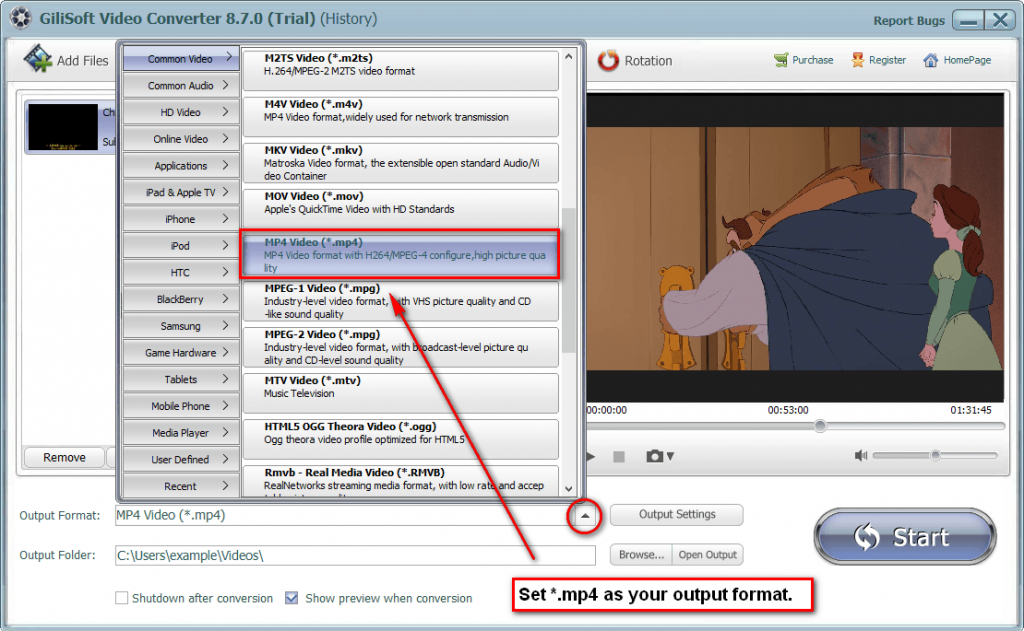
Click the small triangle to the right of Profile, a drop down menu for media format will pop up, select the preferable PowerPoint video format like MPG, AVI, WMV, ASF, MP4 or MOV from the “General Video” category.

Tips: To insert VOB in PowerPoint Windows version, MPEG-1 Video (*.mpg) is recommended.

mkv-to-mp4

 Step 3 >> Edit VOB Files If You Want

Before converting, you can edit the unsatisfied video by clicking the buttons on the top of the interface such as video playing effect (brightness, constract, saturation), video length and dimension.

 Step 4 >> Convert VOB to PowerPoint Video Format

Step 4 >> Convert VOB to PowerPoint Video Format
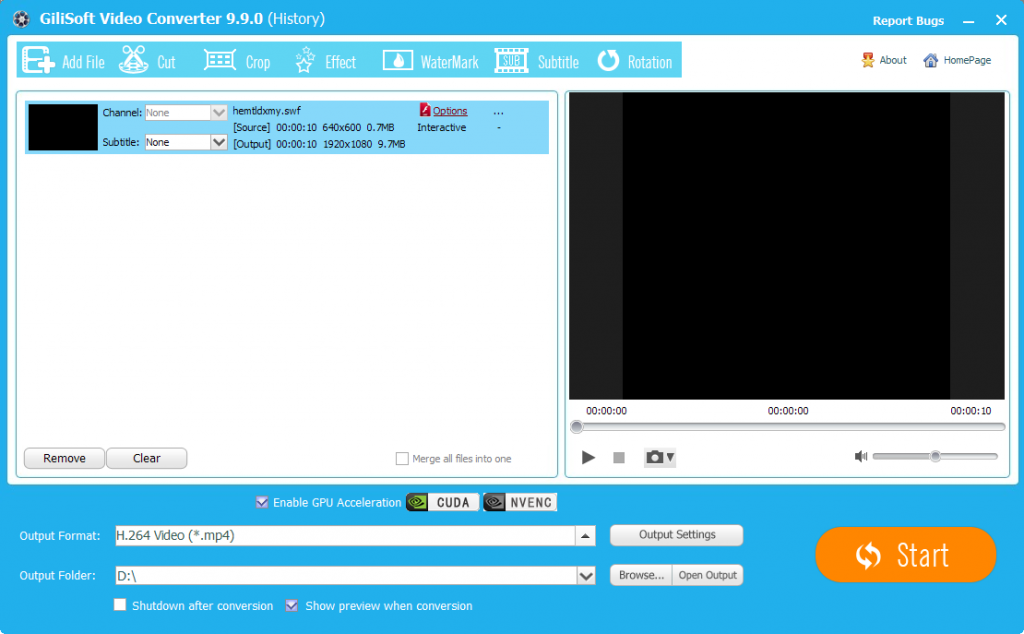
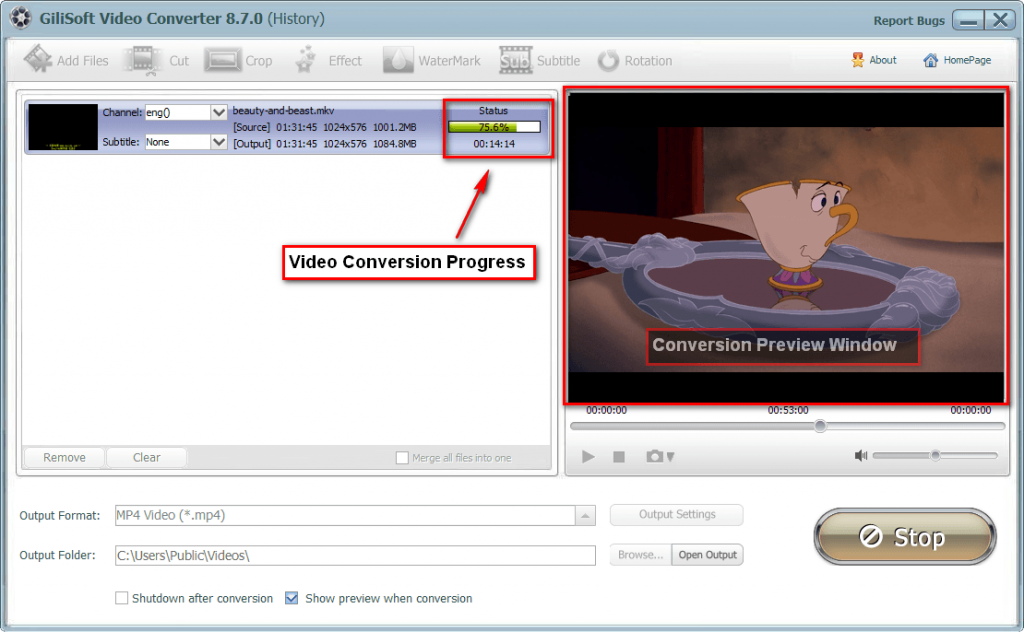
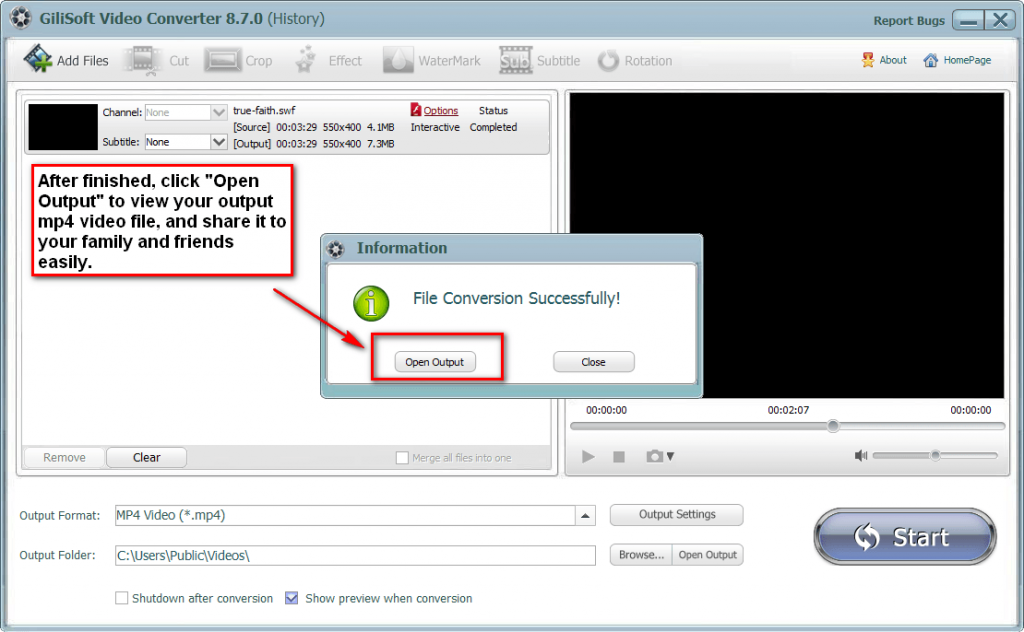
Click the “Start” button to pop up the conversion, you can preview the whole process when conversion, when finished, you can find the target file in the “Output Folder”

swf-to-mp4-conversion

After finishing converting VOB to PowerPoint video format, simply insert the converted VOB files in PowerPoint for playing VOB in PowerPoint.
Tips: make sure the converted VOB files and the PowerPoint in the same directory.

How to Add Subtitles to MP4 Videos on Windows

You can follow this guide if you Already have the corresponding subtitles for the MP4 movie files but just don’t know how to add this subtitle to MP4 video.

To Get Started, Please Download and Install Video Editor Software to Help Add Subtitles

Free download the powerful MP4 Subtitles Adder – Gilisoft Video Editor (for Windows), install and run it, the following interface will show up.
video-editor-main

 Step 1 >> Click on “Subtitle” on the Left

Gilisoft Video Editor is an all-in-one video editing software. If you need to add subtitles to a video, you can choose the module “Subtitle” from the main window.

 Step 2 >> Import MP4 Vidoes

Click on “Add Files” button to import the MP4 video file which you want to add subtitles to.

add-file

 Step 3 >> Attch Subtitles to MP4

Click on “Load Subtitle” drop-down menu to select the subtitle source file you want to add.
Optional: You can adjust the subtitle font, color, size by click the “Font” button;
Optional: You can set subtitle position by dragging the Vertical Position slider right and left or enter a value in the right text box or click up and down arrows to adjust the vertical position of the subtitle.

load-subtitle

 Step 4 >> Set Output Format

When adding subtitles to a MP4 video, you can still choose to convert the MP4 video file to other common video file formats, such as AVI, FLV, MKV…and etc.

set-output-format

 Step 5 >> Complete Adding Subtitles to MP4 Video

Click on the “Start” button to start adding subtitles to your MP4 movies.

MP4 to iTunes Converter – How to Add MP4 to iTune on Windows?

Overview

Many users always encounter iTunes won’t import MP4 issue although iTune said it can support MP4 files. There is also a problem that when we successfully added MP4 to iTunes, but iTunes still fails to sync and transfer the MP4 video files to iPod, iPhone, iPad, and Apple TV. This post is aim to describe the reason and solution to the trouble.

Why Always Can’t Add MP4 to iTunes?

MP4 is a media container format which can be encoded with many different video and audio codecs like DivX, Xvid, H.264, H.263, MPEG-4, AC3, WMA, AAC, etc. While iTunes only support few video and audio codec like MPEG-4 video codec and AAC audio codec; H.264 video codec and AAC audio codec. If the MP4 video is encode with iTunes unsupported video or audio codec, iTunes will not add and play it.

Sometimes, even if the MP4 is in the right video and audio codec that iTunes supports and we can successfully add and play MP4 in iTunes, but if the MP4 video does meet the technical specifications for iOS devices like video size, bitrates, sample rate and etc, we will still fail to sync and transfer the MP4 video from iTunes to iPod, iPad, iPhone, Apple TV and etc.

Solution – Can’t Transfer MP4 to iTunes/iPod/iPhone/iPad/Apple TV

We are finding a soluiton to solve can’t add MP4 to iTunes for palying MP4 in iTunes or transfering MP4 to iPad, iPhone, iPad, and Apple TV – That is converting iTunes unsupported MP4 to a more compatible MP4 video format.

free-download-button


To Get Started, Please Download Conversion Software

Free download the professional MP4 to iTunes Converter – Gilisoft Video Converter (for Windows), install and run it, the following main interface will pop up.

video-converter-main

 Step 1 >> Add MP4 Source File Into Video Converter

Click on the “Add Files” button on the left top of the interface to add the MP4 format files you want to convert, you can also simple drag and drop your MP4 format source files into main screen of the video converter.

add-mkv-file

 Step 2 >> Choose iTunes Supported Format

Click the “Profile” drop-down button to select iTunes supported MP4 format like ‘MP4 MPEG-4 Video(*.mp4)’ or ‘H.264/MPEG-4 AVC Video(*.mp4)’ from the “General Video” category.

mkv-to-mp4

 Step 3 >> Edit Your MP4 File If You Want

Before the conversion, you can edit the unsatisfied video by clicking the buttons on the top of the interface such as video playing effect (brightness, constract, and saturation), video length and dimension.

 Step 4 >> Convert MP4 to iTunes

Click “Start” button to start and finish the MP4 to iTunes format conversion. After finish converting MP4 to iTunes, click “Open Folder” button to get the converted MP4 for transferring to iTunes, iPad, iPod, iPhone, Apple TV.

swf-to-mp4-conversion