Author Archives: Tom

How to Remove Sound from MP4, AVI, MOV Videos

Overview

If you don’t like the background music but love its frame of the video, or there are some noises in the video which is recorded by yourself. So we have to remove audio from video file with video quality remained due to the issues we mentioned above.


Audio Remover

If you want to remove sound from video, Gilisoft Video Editor is one of your best choice. Video Editor can assist you in removing audio from video files with format like AVI, MP4, MKV, FLV, VOB, WMV, MOV, etc.  Now download and install this program and follow the step and step tutorial below to delete your audio file.

Video Editor – Remove Audio file From Video

One of the functions of Video Editor enables you to split the sound from many video like FLV, MP4, AVI, MOV, etc. You can split audio from video in short time by using this powerful program. Besides, it also allows you to add and edit your own audio file to video.

How to Remove Sound from MP4, AVI, MOV Videos

 Step 1.  Start Audio Remover

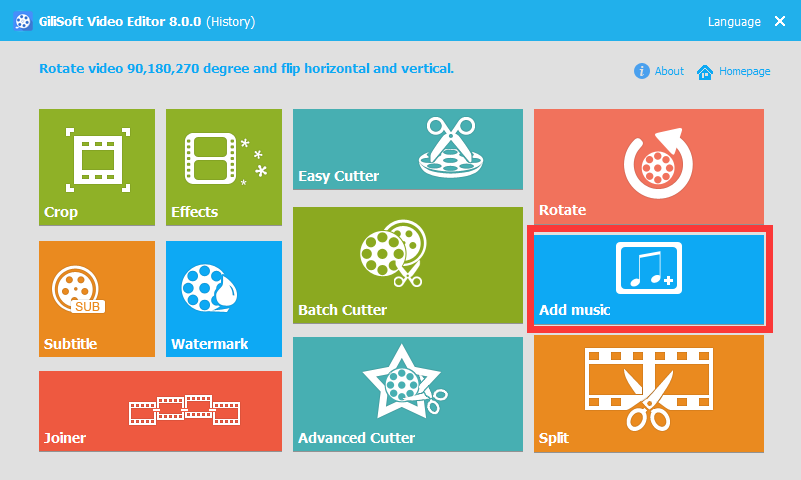
Open this program, then select the “Add Music”. It will allow you to add and remove your own audio file to video.

Step 2. Import Video File

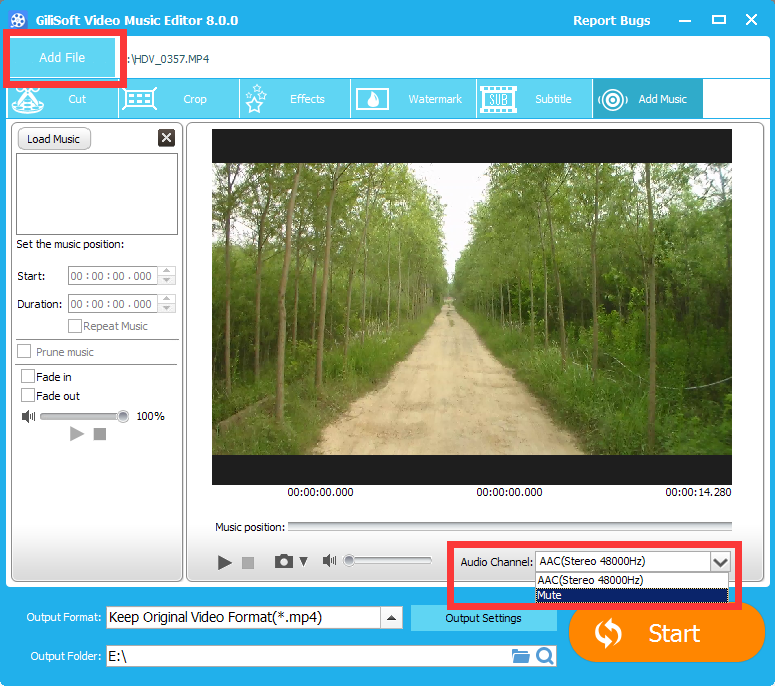
Click “Add File” button to add your video files.

 Step 3. Remove the Sound of Video

Click Audio Channel and select the “Mute” to remove the original sound. If necessary, you can personalize your video by using other functions.

Step 4. Save the Video

If you want to set the video quality, click the “Output Settings” icon. Then you can select the video quality, Encoder, Resolution, Frame Rate and Bit Rate here. Now click the “Start” icon to save the video without original sound.

Conclusion

With this program, you can easily delete sound from MKV, MP4, AVI, MOV, WMV, FLV, etc. Besides acting as a professional audio remover, it is also a powerful Video Editor which provides various editing functions to make a stunning video. Download from below link on your Window and starting enjoying right now.

How to Add SRT Subtitles to Video

There are a lot of reasons to add SRT subtitles to video:

  • Make the videos without subtitles become easy to understand.
  • Provide opportunity to translate the video with subtitles in a foreign language.
  • Offer an alternative to posting lyrics alongside the music video.
  • Make the videos accessible to people who are deaf or hard of hearing

The SRT subtitles can be opened by any player supporting SRT subtitles that are made to run them in conjunction with the video file you are playing. And if your video doesn’t include any subtitles, you can easily add a SRT subtitles to the video with our Gilisoft Video Editor.

SRT files, also known as SubRip format, are named with extension of “.srt”. It is the most basic of all subtitle formats which is supported by most video players. SRT is just a text file contain the subtitle information, which is consists of four parts: the sequential number of subtitles, start and end timecode, subtitle text and a black line. It is possible to edit the file with any text editor according to your demand.

Gilisoft Video Editor is an excellent video toolbox to convert, edit, it cut and join video clips with zero quality loss, apply stylish video effects and filters, add music, titles, and much more. You can find the “subtitle” option to place subtitles to video. It enables you to add subtitles in extension of .srt, and .ass to video files whatever it is in MP4, FLV, VOB, WMV, AVI, MKV or any other video formats. With the easy-to-use but powerful software, you can merge SRT subtitles with MP4 easily.

Download the trial version of the program below and take a try to add your subtitles.

Part 1 Download SRT Subtitles or Create SRT Flies by Yourself

Download SRT subtitles: From many popular subtitles download websites, you can find your desired subtitles in .srt format and modify it.

Create SRT File: As the below pictures shown, there are four basic parts that you need to add for each subtitle phrase.

1. The number that identify subtitle sequence.

2. The time indicating when the subtitle would appear and disappear on the screen.

3. The actual subtitle.

4. A blank line that will indicate the end of this subtitle.
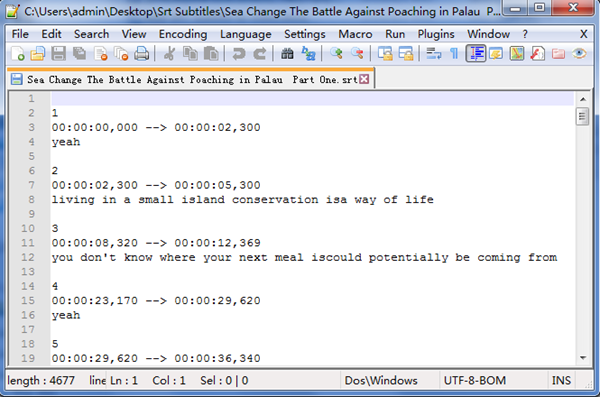
Follow this basic and easy-to-learn pattern, we will take Notepad++ as an example to start editing SRT subtitles.

Step 1. Type Number to Start Creating

Type number   “1”   then press  “Enter” to start first line.

Step 2. Set the Display Time of Subtitles

Input the start and end time of the subtitle displayed on the video then go to next line. The format is in hours: minutes: seconds, milliseconds, and use ” –>” to connect the start time and end time.

Step 3. Add the Text of Subtitles

In this line, you need to add the text of your subtitle. Click “Enter”  to place a blank line.  Now you have finished a subtitle phrase.

Step 4. Finish Your All Subtitles

Repeat step 1 to step 3 until you finish all the subtitles. And make sure that every subtitle phrase including four parts Save the file in SRT format after you finish it. Go to ” File”  then select ” Save As” . In the pop-up window, change the file name to ” xxx.srt”  and select ” All File”  as the save type.

Part 2How to Add SRT Subtitles to Video

Step 1. Add Video File

Launch the software,Go to “Subtitle” tab.
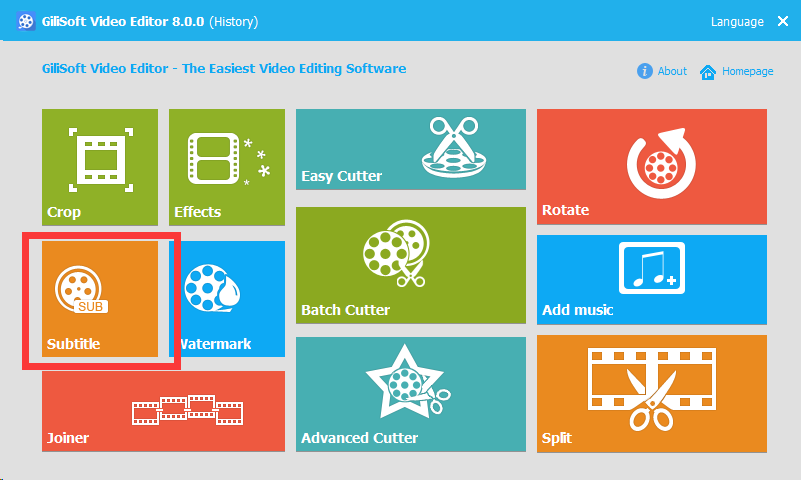
then find and click “Add Files” to add your video file. Or simply drag and drop the files to main interface.
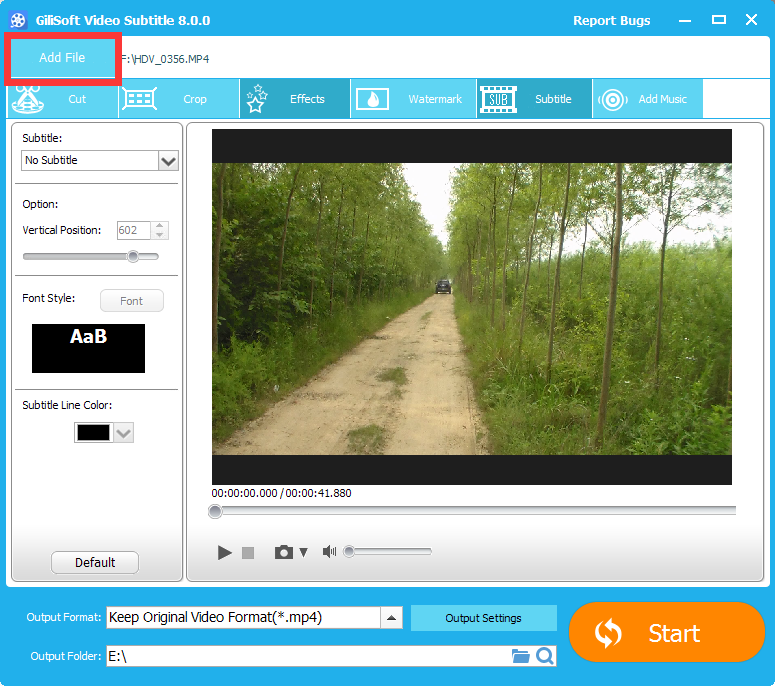
Step 2. Add SRT Files and adjust subtile setting

You can add the SRT file from your local folder.

Set the font, size, color and effect by clicking “T” icon.  Also you can adjust the transparency and position of the subtitle.

Step 3. Preview Your Video

Preview the video with SRT subtitles and click “OK” to save the changes.

Step 4. Convert Your Video(Optional)

If necessary, you can convert your video to the format that your devices support. Then you can transfer the subtitles-included videos to your own portable devices for enjoying anywhere.

Conlusion

There are many different ways to subtitle a video, but the steps will become easier with this software. In addition,  ASS subtitle are supported by Gilisoft Video Editor. You can place any subtitles to your video to make it better, and the program also provides other personalized features to turn your video to a wonderful one. Now you can continue to explore the strong function of this software.
How to Combine MKV Files Into One On Windows 10

How to Combine MKV Files Into One On Windows 10

Combine MKV Files without re-encoding

If you have several MKV files that are all part of one movie, named mymkv001.mkv, mykkv002.mkv, etc, and try to merge into one but keep the video format. So how do you merge these MKV files? There are a large number of people are desire to join multiple MKV files without changing the source file format.

Combine MKV Files with re-encoding

Hi guys, I’m looking for a good application that merges several MKV video files into one complete video meanwhile convert the joined MKV file to MP4 so that I can upload it to YouTube to share with my friends. It’s also a very common requirement to convert the combined file to other formats for some special purpose.

Combine MKV files while edit MKV in other ways

In addition to combining multiple MKV files into one, people usually want to edit MKV like cut, crop, rotate, add or remove subtitle, adjust volume level, etc, for example, how to merge several MKV videos and then add subtitles to the merged MKV file?

Free Download Video Editor to Combine MKV files

Free download video joiner to combine mkv files

How to Combine MKV files with Gilisoft Video Editor

Gilisoft Video Editor is quite powerful, with which, all demands for merging MKV files will be fulfilled such as join several MKV files as well as keep the original format and combine MKV files videos at the same time convert MKV to more popular formats to let you enjoy it widely; Apart from joining MKV files, it also allows you to remove subtitles from MKV file, change audio channel for MKV video, cut long MKV movie to capture your favorite one, add embed subtitles in SRT, ASS, SSA, IDX, and SUB, etc formats to MKV video, adjust MKV frame rate, rotate MKV video, extract audio from MKV movie, etc;

Screenshot of Combine MKV clips

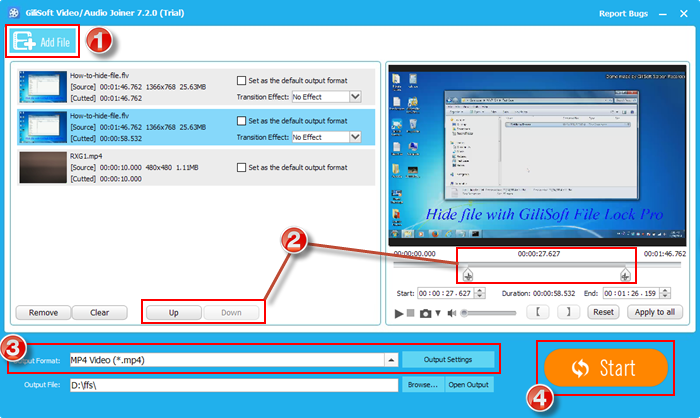
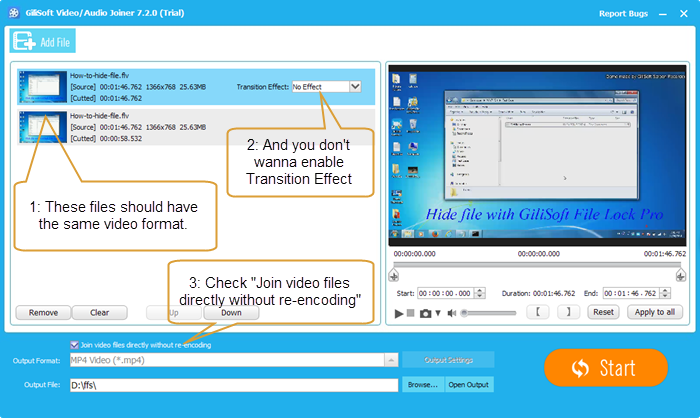
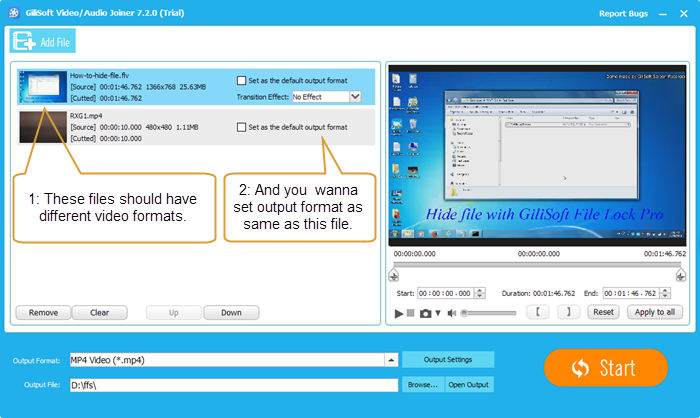
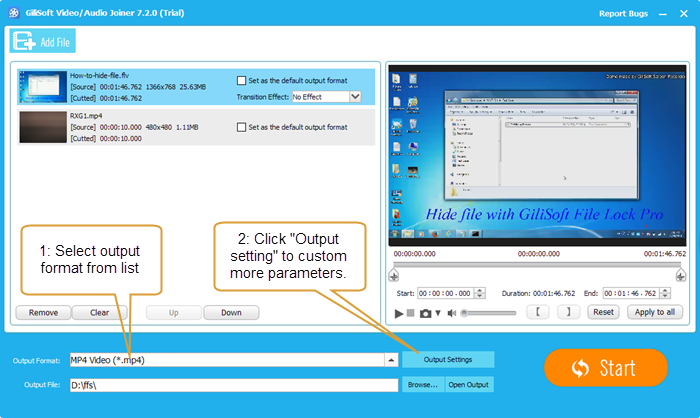
Click “Add File” to load video or audio files. Adjust video sequence via up/down button. Set the start and end of each video/audio.Set output format. Join Video/Audio without re-encoding, Join Video/Audio and select an output format from source, Join Video/Audio and custom output format. Click “Start” to begin joining.

How to Join Video/Audio without re-encoding?

How to Join Video/Audio and select an output format from source?

How to Join Video/Audio and custom output format?

Keep Data Security With Best File Protector Software

Keep Data Security With Best File Protector Software

Do you experience problems with office documents security? Do you need an easy and affordable solution right? Use Gilisoft File Lock Pro – the best file protector software to provide the proper level of valuable financial or technical documents security in your company. Store and exchange your confidential data safely with the software!

Portable, Fast, Reliable PC Encryption software

Gilisoft File Lock Pro provide a great portable, fast and reliable data encryption software to fulfill the widest variety of your personal and business needs. It is  an excellent portable Windows compatible encryption tool, designed specifically to protect user’s files and programs from unwanted access by other persons. It has extended encryption key options that gives a higher level of encrypted files security. Protect your valuable data with the wonderful PC encryption software!

Download File Protector Software

Free Download File Protector Software

How to use File Protector Software

File Protector Software Screenshot

Gilisoft File Lock Pro is a great and affordable files password protection software. It enables you to keep all the private, corporate or confidential data available only for the documents owner. It is easy to protect children from harmful files and media-information limiting their access to them using simple yet solid the password protect folder software. The File Protectort Software as an excellent password protect folder solution have number of functions that allows you effectively protect your data from undesirable access.

Gilisoft File Lock Pro User Guide

Protect Private Files & Folders With File Locker

Why We Need File Locker

Everyone has their own privacy. The more highly developed Internet, privacy confidentiality becomes more important. Sometimes we feel that a number of private photos, logs, video, or some important documents on the computer is not secure. If you use a computer that others use, there’s a File Locker tool will be wonderful. File Locker

Hide File With File Locker

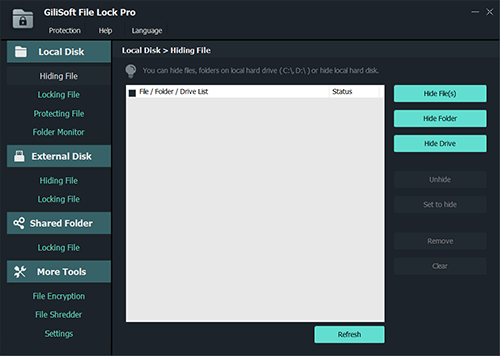
(Folder Hidden through this plan will not be hidden after the uninstallation of Gilisoft File Lock Pro.) Step 1: Launch Gilisoft File Lock Pro and click “Hard disk” then “Hide File”. Step 2: Click “Hide Folder” and then select the target folder in the pop up browser. Step 3: When you want to show the hidden folders, you will be required the master password. Besides, you can also right click the target folder and select “Hide ”. Enter the master password in the pop-up window. Then whole file hiding process will be finished.

Lock Folder With File Locker

(Folder encrypted through this plan will not be password-protected after the uninstallation of Gilisoft File Lock Pro.) Step 1: Launch Gilisoft File Lock Pro and click “Hard disk” then “Lock File”. Step 2: Click “Lock Folder” and then select the target folder in the pop up browser. Step 3: When you want to open the protected folders, you will be required the master password. Besides, you can also right click the target folder and select “Lock (Deny read + run + write)”. Enter the master password in the pop-up window. Then whole encrypt process will be finished.

Encrypt File With File Locker

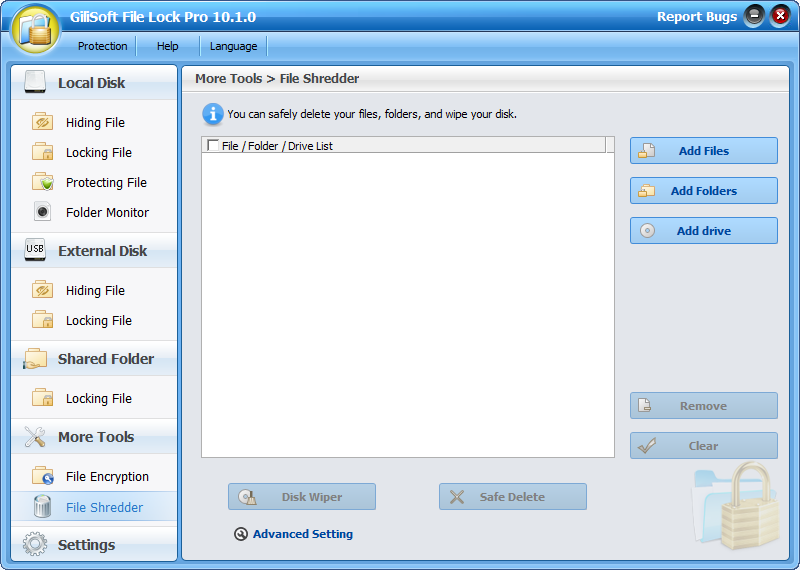
Folders locked through this function will still under protection even Renee File Protector is uninstalled. Step 1: Right-click the target folder, select “Gilisoft File Lock Pro” in the menu and then click “Encrypt a copy” or “Encrypt to *exe”. Step 2: Please enter the independent password in the pop-up window. (Please remember the password.) Step 3: Safe delete the source folder. After the lock process finished, the source folder will still reserve. So you need to safe delete it with “Shred and delete it” function of Gilisoft File Lock Pro. Step 4: Enter the independent password. When you run or extract the password-protected folder, you will be required to enter the password you set when encrypt the folder.
Folder Lock

More User Guide of  File Locker Software

Top 3 Best Free Watermark Video Software for Windows

Top 3 Best Free Watermark Video Software for Windows

Why We Need Watermark Video Software

Wanna stop your shared video be unauthorized using and sharing, when the people playing your video, do you want to let viewers know who the video’s first author are. Only need to adding your ownership information to your video to ensure the ownership and avoiding the unauthorized using.  Add watermark to your video can avoid unauthorized use and copying of it as well as promote your brand and company. It can also make the video more personalized and special.

Top 3 Best Free Watermark Video Software

Here I share top 3 Watermark Video Software video editing tools for watermarking your videos. Read on and learn more about these programs so you can weigh your options on which one to use.

Jahshaka

JahShaka the  Watermark Video Software is a commonly used open-source video editing tool. It boasts support for almost all major operating systems. There are also a ton of tutorials of this application which you can make full use of. Follow along with the instructions of watermarking and you should be the master of this tool.

Watermark Video Software

VirtualDub

VirtualDub is one powerful video editing software with many features in-tact that can help you perform different changes to the video whilst maintaining the video’s quality. You can also use it to add watermarks to your video with the logo filter. Refer to this guide to get more information about how to add watermarks using this tool.

free watermark software

InVideo Programming (YouTube)

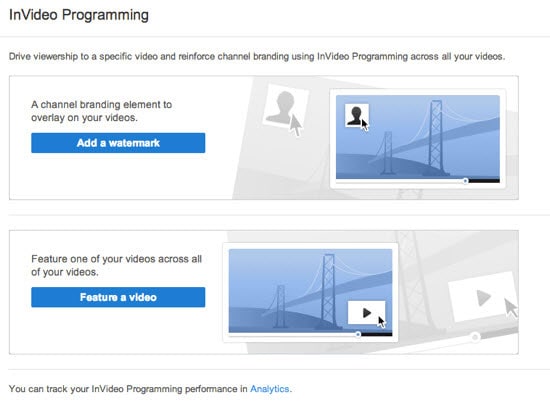
InVideo Programming is a feature that enables you to embed a chosen YouTube video or your channel logo across all of the videos on your channel. With it, you can add watermark your YouTube videos with a few clicks without having to edit the original video.

free video watermark software

Bonus tips of Watermark Video Software

Besides the free video watermark software, here I highly recommend  easiest video editing software- Gilisoft Video Editor . It’s definitely a better option since it’s more convenient to use because of its user-friendly interface. Even if you’re not a pro in video editing, you can watermark and edit your videos with ease. You just have to drag-n-drop the images or logos from your computer or other external devices for watermarking. Here is a detailed guide about how to.

Free Download Watermark Video Software

Guide of  Video Watermark  Removal Software

Free Download Watermark Video Software

How to Remove Watermarks ?
How to Add Text Watermarks ?
How to Add Image Watermarks ?
How to Add Video Watermarks?
How to Add Shape Watermarks?

How to Adjust Video Brightness with Best Video Brightness Editor

Dark Video  Need Video Brightness Editor

Sometimes, people shoot camcorder videos that are too dark to see,  It might happen that after shooting your home video indoors, in bad light or against the sun, it appears to be too dark or blacked out.  Meanwhile, some downloaded videos (e.g. AVI files) need to lighten up to watch better.

Is there an easy way to brighten video so that you can watch them without turning on strong lights?
Yes, here is the solution – Video Brightness Editor  (Windows 10 supported). With it, you can brighten up any video quickly and easily.

How to how to lighten up a video with Video Brightness Editor

This article will discuss how to lighten up a video by using combinations of the brightness and contrast features found in the program.

Video Brightness Editor

Free Slideshow Maker


Step 1: Click on “Add Files” button to import the dark video file which you want to brighten up.

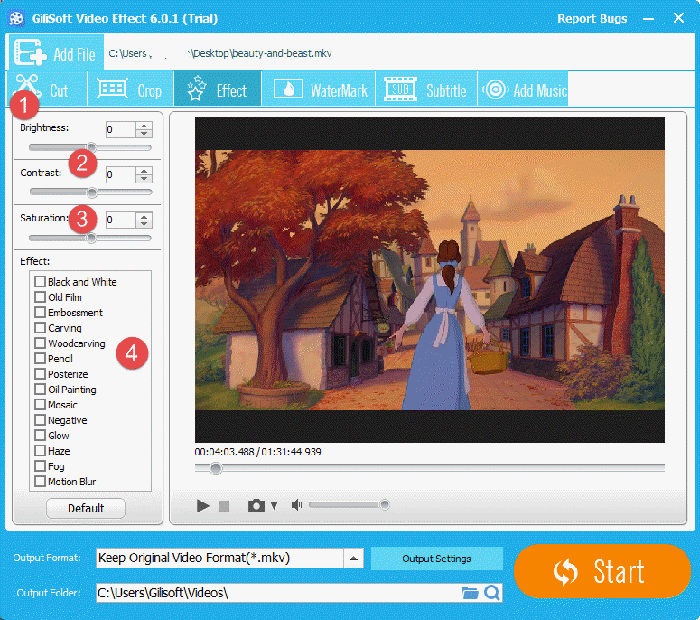
Step 2: Adjust Brightness, if your original video is too dark.  Adjust Contrast to make your video more sharp.  Adjust Saturation to make your video more beautiful. You can also add some pre-designed special effects to your video such as Black and White, Old Film, Embossment, Carving, Woodcarving, Pencil, Posterize, Oil Painting, Mosaic, Negative, Glow, Haze, Fog, and Motion Blur.

To preview the final result in real time, click the Play button to let it go. In such case, anytime when you drag the slider of Brightness and Contrast, you can see the result in real time. Move the slide to brighten the dark video until you get a satisfied result from the preview window.

Step 3: Click “Start” to export the video file.

More User Guide of  Video Brightness Editor

Best Raw Data Recovery Software for Winows or MAC

Best Raw Data Recovery Software for Winows or MAC

We know FAT, NTFS in Windows OS and EXT2, 3 in Linux OS. What is “RAW file system”on earth? The truth is it is a system error that has come to your PC. RAW file system is not a common file system made by any operating system.

Best Raw Data Recovery Software
There are a list of similar problems related with this RAW problem:

  • convert is not available for raw drives
  • chkdsk is not available for raw drives
  • disk is not formatted, do you want to format it now?
  • type file system raw chkdsk not available raw drives
  • Chkdsk reports RAW
  • Invalid media type reading drive. Abort, Retry, Fail?
  • File names contain “weird” characters, “Sector not found” messages.
  • Disk space is 0 bytes.

Best Raw Data Recovery Software is able to restore files from a not accessable raw disk or file system shows RAW or even a reformatted disk. What’s more, it is also the solution that your disk reports has not formatted and wants you to format it and it cannot be reformatted and solution when your disk reports chkdsk is not available for raw drives…

How to  restore files with Best Raw Data Recovery Software on Windows

Step 1: Install and launch Data Recovery for Win

Free Download Best Raw Data Recovery Software on windows

Step 2: Select “Lost Partition Recovery” and then click Next to continue, Gilisoft Data Recovery will check the related file system information and fix corrupted file system.

Step 3: Check the files in RAW drive before fixing Windows 10 RAW drive issue.

Step 4: Click “Fix Drive” to recover Windows 10 RAW drive or switch to Data Recovery Mode and then recover data from RAW drive in Windows 10.

How to recover data from RAW, inaccessible hard drive on Mac

Step 1:  Download, Install and launch Gilisoft Mac Data Recovery on your Mac computer.

 Free Download Best Raw Data Recovery Software on Mac
Step 2: Select “In a specific volume” and then select the inaccessible drive you want to recover data from.

Step 3: Gilisoft Mac Data Data Recovery is scanning the lost data from RAW, inaccessible drive.

Step 4: Select the found files you expect to recover and then click Recover to save them.

Generally, RAW file system, differently from the commonly used NTFS, FAT, exFAT, HFS or HFS+ file system types, is initiatively used to describe the state of a computer hard drive, partition, flash drive, external drive, SD card, Micro SD memory card, CF card and the likes before it has been low level formatted into any supported file system type by manufacturers. And in these days, for storage device users, it is more used as a professional computer term to describe the storage device state that cannot be recognized by both of the Windows and Mac operating system computers. In other words, once a storage device gets the related RAW file system error problems, it often will not be read properly on your computers or laptops before any format. Best Raw Data Recovery Software is able to restore files from a not accessable raw disk or file system shows RAW or even a reformatted disk.

Raw Data Recovery Software for Winows  works for me and I am grateful for such great product you have created. It restored my raw external disk files and mostly images that I cannot afford to lose.  

Raw Data Recovery Software for Mac  This one recovered all my photos from a backup external drive that I lost the origianl copy by ghost the wrong drive and the external drive became raw file system.

Best Free Screen Recording Software Windows 11

Best Free Screen Recording Software Windows 2022

Most people record computer screens to demonstrate how to do something, such as in a tutorial. Others use recordings to document malfunctioning softwares and websites so that someone can help troubleshoot. Some people even use hidden screen recorders to catch and verify intruder activity. Here we will recommend Best Free Screen Recording Software Windows will  best fulfill your needs.

Best Free Screen Recording Software Windows

Fastest Way to Screen Capture, Record Videos & Share for FREE.

Free Screen Recorder is a free screen capturing and video recording solution provided by Gilisoft. Used by more than 27000 companies worldwide.  Best Free Screen Capture & Video Recording Software is a free screen capture & video recording software for Microsoft Windows. With Free Screen Recorder, you can capture images and videos of your computer screen, add comments and share them with others in minutes. Free Screen Recorder is built by Gilisoft and is available for free.

Why it is Best Free Screen Recording Software Windows

When compiling a list of the best screen recording software for Windows, CyberLink PowerDirector 14 Deluxe.  MAGIX Movie Edit Pro.  Sony Movie Studio.  Windows Movie Maker. Lightworks. Avidemux.  Pinnacle Studio. AVS Video Editor. we tend to keep coming back around to Free Screen Recorder. It’s never been easier to capture and record your screen to FLV,MP4,AVI,WMV!

How to use Best Free Screen Recording Software Windows

How to Add Image to Video With Video Watermark Software Windows 10

How to Add Image to Video With Video Watermark Software ?

Why to Add Image to Video?

Watermarking your videos (Add Imge to Video) is fairly an easy method to brand your videos.For videographers, video authors, video publishers or video site webmasters, it is important to add image with personal info and logo to videos before upload them to sharing websites, which could be effective way to prevent others from copying and using your video without your authorization.

How to Add Image to Video?

Step 1. Download and Install Gilisoft Video Editor

Free Download Add Image to Video Software

Step 2. Choose the Watermark Fuction to Add Image to Video

How to Add Image to Video

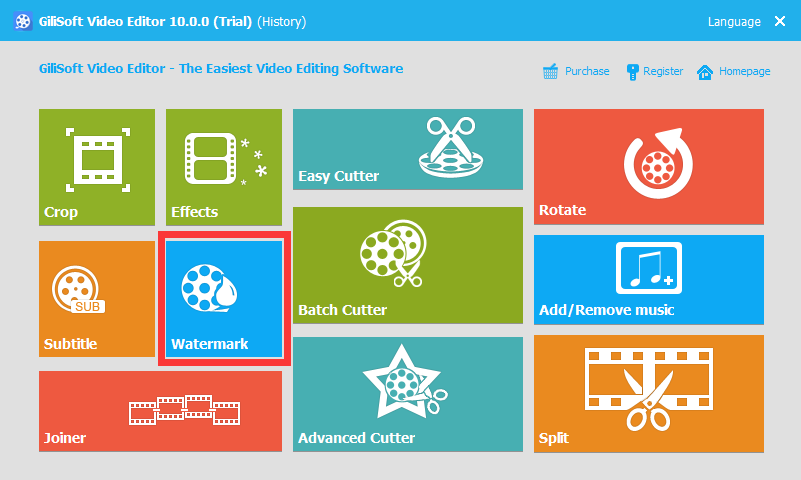
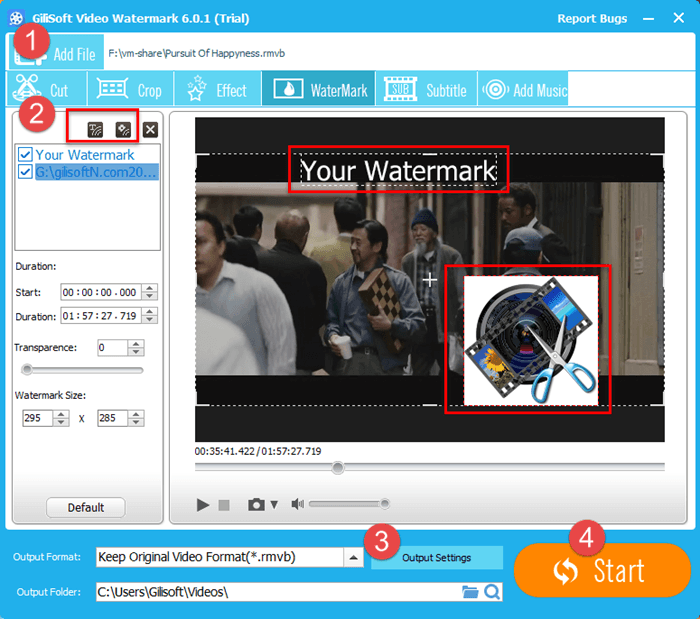
To begin with, start Add Image to Video Editor to do the Video editing work.  Select ‘Watermark’ to  make your own watermark on your video.

Step 1. Add video files

Click on ‘Add File’ button to add videos to the main panel.

Step 3. Apply transitions and effects to edit Video

Step 3. Convert watermarked video with Watermark Video Editing Software
 

If you want to watch the watermarked video on your portable media device like iPod, iPhone, etc., choose Video File output way. There will be dozens of preset output profiles for converting video to almost every kind of media devices like iPod, iPhone, PSP, PS3, iPad, Zune, Xbox 360, mobile phones and more.

What video/audio file formats does Gilisoft Video Editor support?

Input Video formats
3GP, 3G2, AMV, ASF, AVI, DAT, DivX, DV, F4V, FLV, H264, M1V, M2T, M2TS, M2P, M2V, M4V, MKV, MOD, MOV, MP2V, MP4, MPE, MPG, MPEG, MPV, MPV2, MTS, MTV, MXF, NSV, OGG, OGM, OGV, QT, RM, RMVB, SWF, TOD, TP, TRP, TS, VOB, VP6, WEBM, WM, WMV
Output Video formats
3GP, ASF, AMV, AVI, FLV, VOB, M2TS, M4V, MKV, MOV, MP4, MPG, MTV, MXF, OGG, RMVB, SWF, TS, WebM, WMV
Input Audio formats
AAC, AC3, AIFF, AIF, AMR, AU, FLAC, M4A, MKA, MP2, MP3, MPA, OGG, RA, RAM, VOC, WAV, WMA
Output Audio formats
AAC, AC3, AIFF, AMR, AU, FlAC, M4A, M4B, M4R, MKA, MP2, MP3, OGG, RA, VOC, WAV, WMA