The Best AVI Video Editing Software for Window 10

The Best AVI Video Editing Software for Window 10

The AVI codec is becomes more and more popular for its ability to compress lengthy video segments into small sizes while maintaining relatively high visual quality. To edit AVI videos fast while maintaining the quality, you need a powerful and easy to use AVI video editor. Looking for powerful but user-friendly AVI video editing software? You’ve found it. Enhance, highlight, and transform your video with advanced options that allow you to combine clips, music, text, special effects, and more. Gilisoft Video Editor is such professional AVI Video Editing Software that gives you full control of your AVI movie creation.

Download and Install AVI Video Editing Software

Free Download AVI Video Editing Software

How to  Edit AVI with AVI Video Editing Software

Step 1. Choose the Editing Fuctions

AVI Video Editing Software

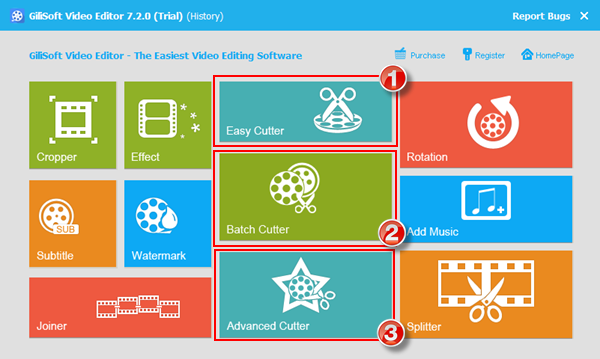
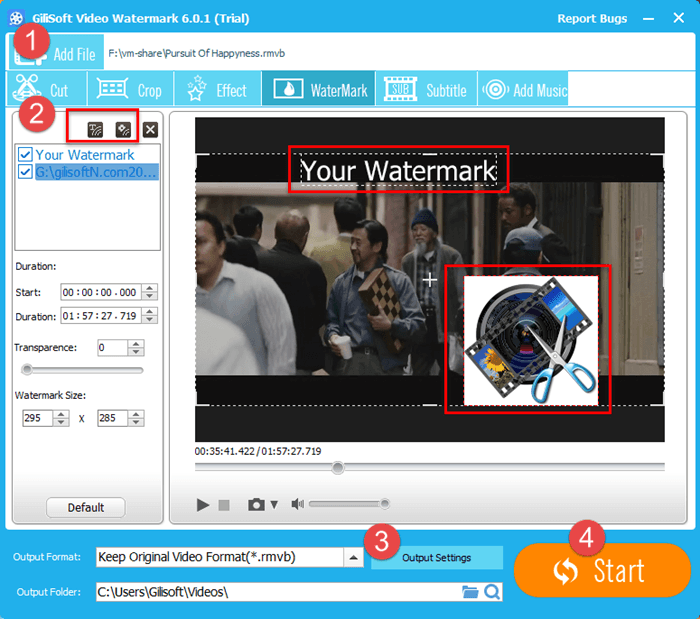
To begin with, start AVI Video Editor to do the AVI editing work.  Select ‘Joiner’ to Mix AVI Videos in One.   Select ‘Effect’ to Add Multiple Special Effects to AVI Video. Select ‘Cropper’ if you want remove any unwanted area from your AVI video!  Select ‘Splitter’ to divide the AVI files according to the size or time. Select ‘Watermark’ to  make your own watermark on AVI video.

Step 2. Add AVI video files

Click on ‘Add File’ button to add AVI videos to the main panel.

Step 2. Apply transitions and effects to edit AVI

Step 3. Convert edited DIVX to video with AVI Video Editing Software
 

If you want to watch the edited AVI video on your portable media device like iPod, iPhone, etc., choose Video File output way. There will be dozens of preset output profiles for converting AVI to almost every kind of media devices like iPod, iPhone, PSP, PS3, iPad, Zune, Xbox 360, mobile phones and more.

What video/audio file formats does Gilisoft Video Editor support?

Input Video formats
3GP, 3G2, AMV, ASF, AVI, DAT, DivX, DV, F4V, FLV, H264, M1V, M2T, M2TS, M2P, M2V, M4V, MKV, MOD, MOV, MP2V, MP4, MPE, MPG, MPEG, MPV, MPV2, MTS, MTV, MXF, NSV, OGG, OGM, OGV, QT, RM, RMVB, SWF, TOD, TP, TRP, TS, VOB, VP6, WEBM, WM, WMV
Output Video formats
3GP, ASF, AMV, AVI, FLV, VOB, M2TS, M4V, MKV, MOV, MP4, MPG, MTV, MXF, OGG, RMVB, SWF, TS, WebM, WMV
Input Audio formats
AAC, AC3, AIFF, AIF, AMR, AU, FLAC, M4A, MKA, MP2, MP3, MPA, OGG, RA, RAM, VOC, WAV, WMA
Output Audio formats
AAC, AC3, AIFF, AMR, AU, FlAC, M4A, M4B, M4R, MKA, MP2, MP3, OGG, RA, VOC, WAV, WMA

The Best Divx Video Editing Software for Window 10

The Best Divx Video Editing Software for Window 10

The DivX codec is becomes more and more popular for its ability to compress lengthy video segments into small sizes while maintaining relatively high visual quality. To edit Divx videos fast while maintaining the quality, you need a powerful and easy to use Divx video editor. Looking for powerful but user-friendly DivX video editing software? You’ve found it. Enhance, highlight, and transform your video with advanced options that allow you to combine clips, music, text, special effects, and more. Gilisoft Video Editor is such professional Divx Video Editing Software that gives you full control of your Divx  movie creation.

Download and Install Divx Video Editing Software

Free Download Divx Video Editing Software


How to  Edit Divx with Divx Video Editing Software

Step 1. Choose the Editing Fuctions

To begin with, start Video Editor to do the DIVX editing work.  Select ‘Joiner’ to Mix Divx Videos in One.   Select ‘Effect’ to Add Multiple Special Effects to Divx Video. Select ‘Cropper’ if you want remove any unwanted area from your Divx video!  Select ‘Splitter’ to divide the Divx files according to the size or time. Select ‘Watermark’ to  make your own watermark on Divx video.

Step 2. Add DIVX video files

Click on ‘Add File’ button to add DIVX videos to the main panel.

Step 2. Apply transitions and effects to edit DIVX

Step 3. Convert edited DIVX to video with Divx Video Editing Software
 

If you want to watch the edited DIVX video on your portable media device like iPod, iPhone, etc., choose Video File output way. There will be dozens of preset output profiles for converting DIVX to almost every kind of media devices like iPod, iPhone, PSP, PS3, iPad, Zune, Xbox 360, mobile phones and more.

What video/audio file formats does Gilisoft Video Editor support?

Input Video formats
3GP, 3G2, AMV, ASF, AVI, DAT, DivX, DV, F4V, FLV, H264, M1V, M2T, M2TS, M2P, M2V, M4V, MKV, MOD, MOV, MP2V, MP4, MPE, MPG, MPEG, MPV, MPV2, MTS, MTV, MXF, NSV, OGG, OGM, OGV, QT, RM, RMVB, SWF, TOD, TP, TRP, TS, VOB, VP6, WEBM, WM, WMV
Output Video formats
3GP, ASF, AMV, AVI, FLV, VOB, M2TS, M4V, MKV, MOV, MP4, MPG, MTV, MXF, OGG, RMVB, SWF, TS, WebM, WMV
Input Audio formats
AAC, AC3, AIFF, AIF, AMR, AU, FLAC, M4A, MKA, MP2, MP3, MPA, OGG, RA, RAM, VOC, WAV, WMA
Output Audio formats
AAC, AC3, AIFF, AMR, AU, FlAC, M4A, M4B, M4R, MKA, MP2, MP3, OGG, RA, VOC, WAV, WMA

USB Blocker Disable USB Port Lock With Password in Windows 11

USB Blocker Disable USB Port Lock With Password in Windows 11

Why We Want USB Port Lock With Password?

Maybe you are working on home Windows PC or in an office, working on a virus free system and prevent any unauthorized access is you wanted. There are many cases of malware unknowingly infecting your computer via a USB. External intrusions can happen when you are leaving computers without an effective antivirus program or from the USB port, when an external USB drive is connected, with the intention of transferring data.  Hence it’s important that you not only guard your PC online but also offline where a major threat can be the unauthorized use of the USB ports. Gilisoft USB Lock is a very handy USB Port Lock With Password tool that could prevent malware from infecting your PC as well for preventing unauthorized people from copying your sensitive data. Stop Data Theft & Corporate Spying, Prevent Viruses, Assure PC Privacy, Please Free Download it Now!

USB Port Lock With Password

Free Download USB Port Lock with Password – Keep your computer safe from harmful, virus infested files by restricting all USB access.

How to Block USB Port Lock With Password?

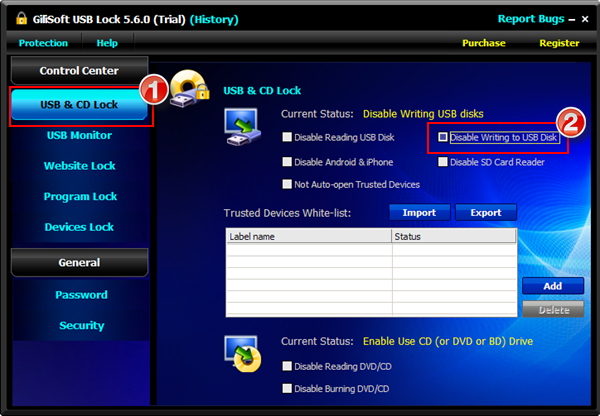
1). How to block USB Port Lock With Password to prevent anyone from copying files to the USB drive?

USB Port Locker With Password

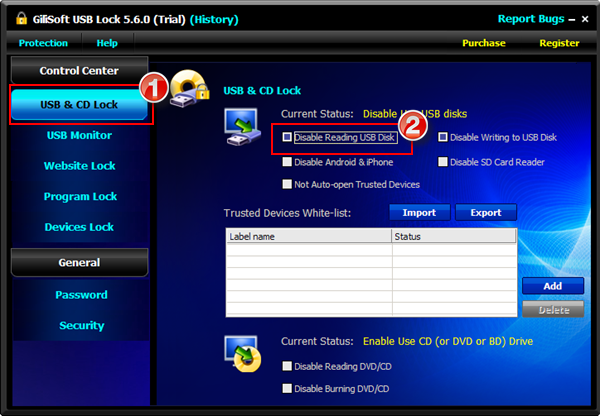
2). How to prevent anyone from reading files on the USB drives ?

USB Port Lock With Password

3). How to prevent anyone from reading files on SD/Card reader ?

4). How to prevent anyone from connecting to iPhone or Android phone ?

In conclusion

 The USB port is one of the prime areas where the virus can enter in the system. Is there a way to Password Protect the USB Ports in Windows 10 so that every time a USB disk  is inserted a prompt comes out asking for a password before it can be used on the PC ? With Gilisoft USB Lock a simple tool that allows you to block and unblock your USB port to access.  So blocking and unblocking of storage devices on any windows system now can be done very easily and effectively with a Windows USB Port Lock With Password. To sum it up, USB Port Locked With Password is a professional security application of its kind. If want disable usb port in windows  using cmd, you need contact Gilisoft to request the command line version.

How to Password Protect a Thumb Drive

How to Password Protect a Thumb Drive

USB drives are portable and very small in size and manufacturers are aiming for making them even smaller with each evolution, which means you can easily lose huge amounts of data in an instant. If access to your information is not protected, anyone can easily use it for the wrong purpose. So learn How to Password Protect a Thumb Drive and password-protecting your USB drive or at least the sensitive data is of extreme importance. Encrypting your USB drive with a password is the best way to go when you need a protection that is extremely hard to break.

However, encrypting a whole drive is not always the answer to protecting your data on a USB drive. May be you just have a single document that you need to protect, or a few MBs worth of files, why go through the whole-disk encryption process? In this tutorial, we are going to list simple to complex methods to password-protect a USB drive, you can select the one that fits your needs best.

How to Password Protect a Thumb Drive

Download Gilisoft USB Stick Encryption from the button below.
how to password protect a thumb drive
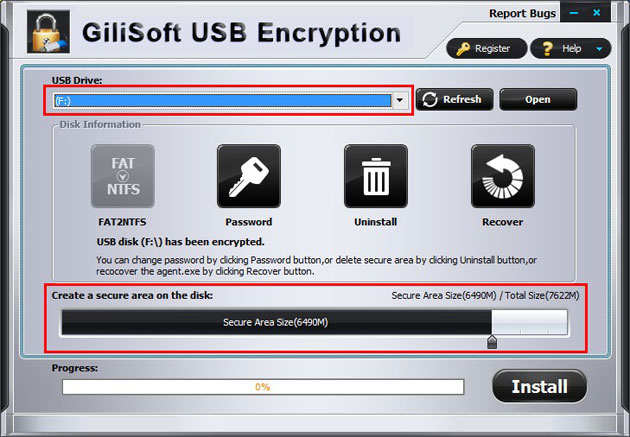
Please insert the USB stick that you want to password protect into the USB port of your computer.
Choose the drive and set the size of secure area will be created.
Click on the “Install” button to start creating secure area.
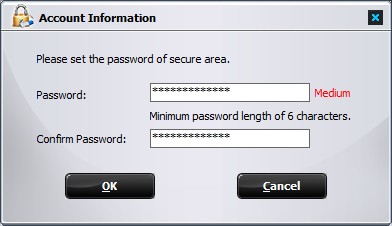
Set the user name and password of the secure area and click on the “OK” button to finish the operation.
GiliSoft USB Encryption is a comprehensive, easy-to-use solution for USB security that supports encrypting portable storage device (external drive) and can divide external drive into two parts after encryption: the secure area and public area. Converts a regular USB flash drive into a secured one in less than a minute, data on the protected area (Secure area) is encrypted by 256-bit AES on-the-fly encryption.

Best Folder Lock Software for Windows 10

Best Folder Lock Software for Windows 10,11

  • Over half of us have naked pictures of us on our PCs. Many end up unwanted on the web.
  • $4 Billion were lost from the US economy as a result of data breaches.
  • The cost of a stolen laptop to your business is on average $53 000.
  • Company directors can go to jail for failing to encrypt sensitive information.
  • Half of the divorces in the United States name porn as the culprit.
  • Malware can upload files from your computer to the internet, for anyone to access

Secure your privacy with Folder Lock Software for Windows 10 to protect your important and personal files from anyone else who might use your computer or when your computer is shared at work. We would like for Microsoft to release a Windows version that allows users to password protect specific folders that contain sensitive data. Until that happens, if you want to do this, you have to use third-party software made by other companies. Now let me show you the Best Folder Lock Software for Windows 10 – Gilisoft File Lock Pro.

Folder Lock Software for Windows 10

How to lock files, folders, and drives with Folder Lock Software for Windows 10?

1) How to password protect files, folders, and drives on local disk.

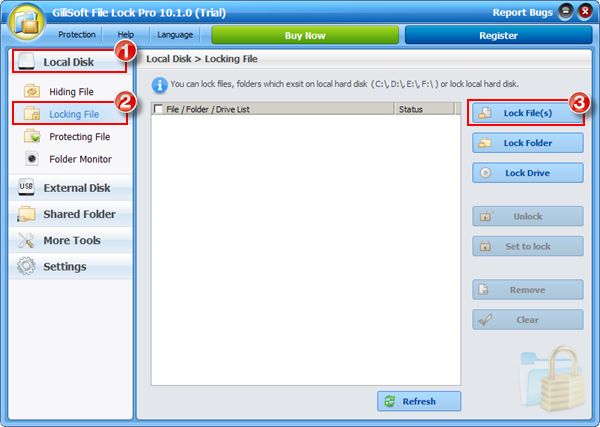
Run Gilisoft File Lock Pro, and then click on the “Local Disk ” module.

Select “Locking File” under the module of “Local Disk”.

Click on the “Lock File(s)”, “Lock Folder”, “Lock Drive” button to select the file you want to password lock.
2) How to password protect files, folders on external disk.

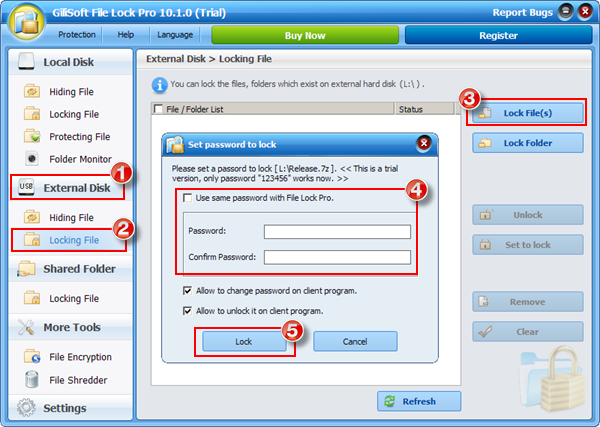
Run Gilisoft File Lock Pro, and then click on the “External Disk ” module.

Select “Locking File” under the module of “External Disk”.

Click on the “Lock Files” button to select the file you want to password protect.

Set the password and Click “Lock” button to complete. (You can use the master password or set a new password to lock.)
3) How to password protect shared network folder.

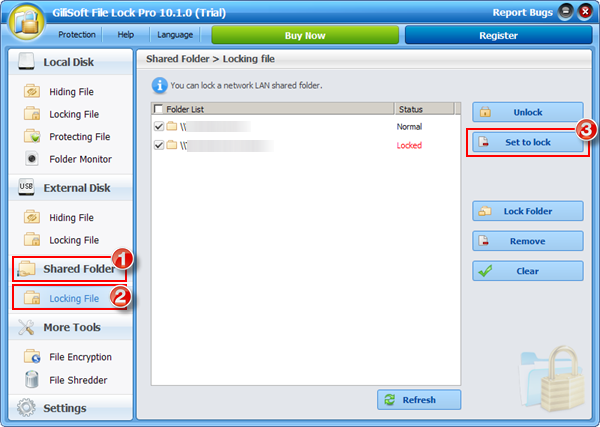
Run Gilisoft File Lock Pro, and then click on the “Shared Folder” module.

Select “Lock Files” under the module of “Shared Folder”.

If the shared folder appears in the folder list, please click on the “Set to lock ” button to lock. If you have not found the shared folder, please click “Lock Folder” to lock the shared folder you want to password protect.

Gilisoft File Lock Pro ‘s Password Protection Solution make you No Worries of Data Theft,No Worries of Privacy Leaks.  With only one password, you can lock and unlock important office documents, photos, videos, and other items in any format and any amount at the same time.  It keeps locking your important data. Even if your PC is threatened by malicious attacks, without unlocking them by entering the password you set, your files can not be stolen and are kept safe.   It securly protect your important and personal files from anyone else who might use your computer or when your computer is shared at work.

How to Lock USB Port With Password On Windows 11

How to Lock USB Port With Password On Windows 11

Question from http://answers.microsoft.com : I Wonder How to Lock USB Port With Password so that whenever I plug in any USB storage, such as USB flash drive,  pendrive etc., the system will prompt for password which will protect my computer from unauthorized people to use my USB port and help prevent intruding viruses.

How to Lock USB Port with Password

How often you have witnessed blocked Pen drive or USB drive access in your work place or college or school? I believe many times; in fact every time you try to use the USB drive, you are not allowed, simply because the administrator has disabled USB drive detection on your Windows system. Again, how often has your data been stolen because someone connected an unauthorized USB to your computer and copied your files? Well, you don’t need to worry because the solution to disable or enable USB Ports is pretty simple. We will show you How to Lock USB Port With Password now.

How to Lock USB Port With Password?

Firstly, Please Download Gilisoft USB Lock from the button below.

Free Download Usb Port Password Locking Software

1). How to Lock USB Port With Password to prevent anyone from copying files to the USB drive?

How to Lock USB Ports with Password

2). How to prevent anyone from reading files on the USB drives ?

3). How to prevent anyone from reading files on SD/Card reader ?

4). How to prevent anyone from connecting to iPhone or Android phone ?

How to Lock USB Port with Password Protection: Security is an area where no compromise should be allowed at all. It doesn’t matters if you are using office, home or any other system, security is must in order to prevent unauthorized access or virus exposure. The most suspected area to intrusion is USB port as it is used in excess. USB ports are used for data transfers and other network connections also. Someone may also try to steal your data using Pen drives or so through USB ports, or may malfunction your system by exposing it to viruses and malware.  Thus it is important to be safe from any intrusion and unauthorized access. In order to be secure you must lock USB port with password protection using Gilisoft USB Lock. Gilisoft USB Lock helps to lock USB port with password protection easily. You can block USB port with password or unblock USB port easily using this tool without any modification to Windows Registry. Just download and install the Gilisoft USB Lock and lock USB Port with password on your system at any time.

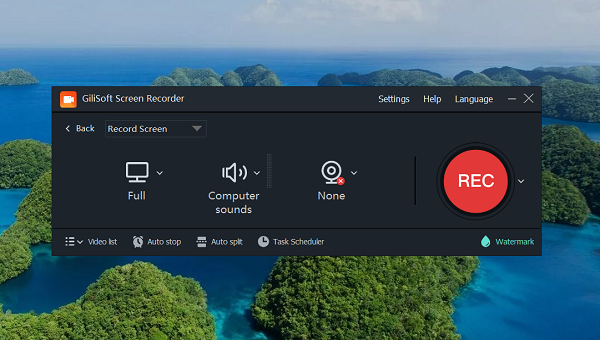
Looking for Screen Recorder with Zoom Function on Windows 11?

Zooming is a technique that allows you to change the view distance (from close-up to wide shot) during a video shooting. One question from Quora.com “I am looking for  some tools to capture the screen for coding purposes. I mean to make programming tutorials. When I type some code it should be able zoom to the cursor point for better visibility. Could someone suggest some tools?” Another question from microsoft.com “What is a good free screen recorder that let’s you zoom in on certain parts of the screen? ” I’ve used some of screen recording programs. Gilisoft Screen Recorder is Screen Recorder with Zoom Function let you zoom-in any desired region or zoom-out of it simply by pressing a key (or key combination) or using the mouse. Free Download the Screen Recorder With Zoom Now! Gilisoft Screen Recorder Windows
Free Slideshow Maker

How to Zoom In while recording with Screen Recorder with Zoom ?

Screen Recorder with Zoom
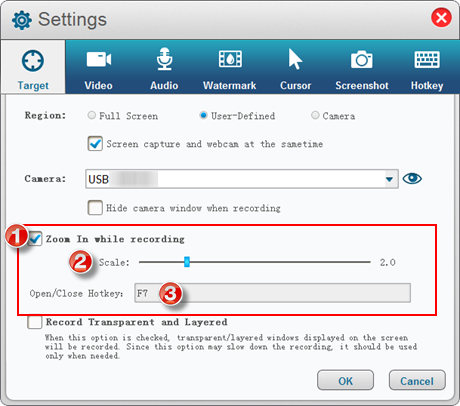
  In “Settings” window, just go the the “Target”, please check the “Zoom In while recording”. Set the scale from 1.5 to 4.0.  You can change the default hotkey if you need. When start recording, you can move the mouse cursor to the position you want to Zoom into any part of the recording  , then use Hotkey to zoom in. Gilisoft Screen Recorder captures video, sound and pictures of anything you see on your screen. Any part of the screen, any window on the screen or the entire desktop can be recorded. You can record your web cam sessions, favorite games, any software on your desktop, video displays on your screen, record audio of what you hear from your speakers, use it for your business solutions, prepare video presentations, tutorials.

Make a Video From Pictures On Windows 10

Make a Video From Pictures On Windows 10

Want to make a video from pictures or create a nice home video for a birthday party featuring many pictures that are looped together in a slideshow? Don’t worry, you can still make great videos using still photos, and pictures with the help of different video slideshow makers available on the market. Maybe you don’t know which one to choose, here great video slideshow makers- Giliosft Slideshow Movie Creator is recommended.

To Make a Video From Pictures and Music, you’ll need:
1. Digital pictures and music.
2. Video slideshow software (e.g. GiliSoft Slideshow Movie Creator) .
Free Download GiliSoft Slideshow Movie Creator  Now!

Make a Video From Pictures

Now see how to make a video from pictures and music:

Make a Video From Pictures

Step 1: Add Photos

Once launched, you will start from Photo tab. Here, click Add button to import favorite photos to the storyboard. If required, double-click media sources to edit.When you import photo, random photo transition will automatically applied to them. But you can change photo transition by clicking transition thumb on storyboard and select desired transition in the resulting dialog. This video slideshow maker contains 250+ smooth transition & motions for a personalized slideshow. You will enter Header and Trailer tab. Here, you can add picture/video header and picture /video trailer.

Step 2: Set Effects

Click Effects, you will enter Effect tab. Here, you can adjust effects.

Step 3: Add Music

Click Music, you will enter Music tab. Here, you can add the music files.

Step 4: Save Video to MP4 or Whatever

Go to “Export” tab and in the Output formats drop-down list, select MP4 as the video format. Then click Start to save video for Facebook/YouTube. You can also click Settings button to customize video options, e.g., the video resolution, frame rate, bitrate, audio sample rate, etc.All done. It’s so easy to make a video with pictures and music. Get the video slideshow making software to make your own video with photos and music, and upload to Facebook/YouTube for sharing with the world!

Gilisoft Slideshow Movie Creator makes home movies and photos amazingly fun. With Gilisoft Slideshow Movie Creator, you can create, edit, and share your photos and home movies right on your computer. Build your movie with a few simple drag-and-drops. Then share your movie via the DVD, Blu-ray player, Youtube, TV, e-mail, or iPhone, iPad. Using third-party software you can even take movies you’ve made and turn them into DVDs. and Gilisoft Slideshow Movie Creator also is a professional photo slideshow software to make HD picture slideshow with photos, videos and music to cherish your photo memories. It can create DVD slideshow with photos and video clips, make photo slideshow with transitions, background music, caption, illustraion, narration, effect, etc. and create Blu-ray Movie!

Free Video Cropping Software On Windows 10

Free Video Cropping Software On Windows 10

It is undoubtedly that there will be times when you need to remove unwanted parts, crop your video to delete unnecessary information and draw your viewers’ attention to the most important elements. Your video will look much better if you crop or remove black bars from the sides or remove background that doesn’t contribute anything to the finished product. Here I present one of the best Free Video Cropping Software -Gilisoft Video Editor that will allow you to easily crop videos.

Install the Free Video Cropping Software

Free Download Free Video Cropping Software

Download and run the Free Video Cropping Software -Gilisoft Video Editor installation file. Just follow instructions to install the software correctly. Start the program and click ‘Crop’ to begin cropping your video to delete unnecessary information .

How to Crop Video

Step 1: Add the Video File You Want to Crop

 Free Video Cropper

Click the Add Files button. In the window that opens, select the video file you want to crop.

Step 2: Crop Your Video

Stretch and move the rectangle in the Preview Window to define the desired frame area. To maintain the aspect ratio of the frame check the ‘Keepp Aspect Ratio’ box.

But Gilisoft Video Editor is much more than free video cropping software. It is a multifunctional video editor: in addition to splitting, merging and cropping video files, it enables you to improve video quality, apply special effects, add music and titles, and much more. You may also cut or rotate the video, or add effects, watermark or subtitle to the video at the same time.

Step 3: Save Your Cropped Video

Check “Set as the default output format” on a video file to set Output Format automatically, and you can also set output format manually by clicking on the little drop-up output formats selection icon.   Click “Start” to begin cropping video.

Bonus Tips:

With Free Video Cropping Software , you can easy to crop any format videos, it’s a 100% freeware, 100% SAFE and CLEAN, it does not contain any form of malware.  If you are looking for a simple soluiton to crop your videos, Free Crop Video is your best choice! Cropping video with Gilisoft Video Editor is an easy one-click task. Just add your video to the program, specify the area you want to crop, and save the finished product in the format of your choice: MP4, AVI, FLV, WMV, MPEG, and more.