
Decide whether to capture the full screen, a selected area, an application window, webcam video, or screen and webcam together.
GiliSoft Screen Recorder User Guide
How to Use GiliSoft Screen Recorder
Learn how to record the full screen, a selected region, an application window, webcam video, system sound, and microphone narration on Windows. This guide also covers scheduled recording, automatic stopping, file splitting, and output settings.
 Screen Recorder workspaceChoose the target, sound sources, webcam, and recording controls.
Before you start recording
A short setup check prevents missing sound, an incorrect capture area, and recordings being saved to the wrong folder.
Select system sound, microphone input, both sources, or no audio according to the recording task.
Choose a local folder with enough free space, especially before meetings, lessons, or other long recordings.
Hide notifications and close unrelated applications before capturing the desktop or a large screen region.
Main recording dashboard and capture controlsInstall and open GiliSoft Screen Recorder, allow Windows access to the microphone or camera when requested, and make a short test recording before an important session.
Quick start: record a Windows screen video
Start with these four decisions, then use the detailed steps and screenshots below.
Choose the full screen, a region, an application window, or webcam capture.
Record system sound, microphone narration, both sources, or no audio.
Record, pause, resume, annotate, and stop from the controls or hotkeys.
Open the saved recording and verify the picture, sound, and timing.
Select the capture area and start recording
- Open GiliSoft Screen Recorder.
- Choose full screen, a selected region, or the application window you want to capture.
- Select system sound, microphone, or both audio sources.
- Confirm the output folder and recording format.
- Click Record and wait for the countdown.
- Pause when necessary, then stop recording and open the saved file for review.
For a game, media player, browser video, demonstration, or desktop application, select only the area or window needed so unrelated screen content is not included.
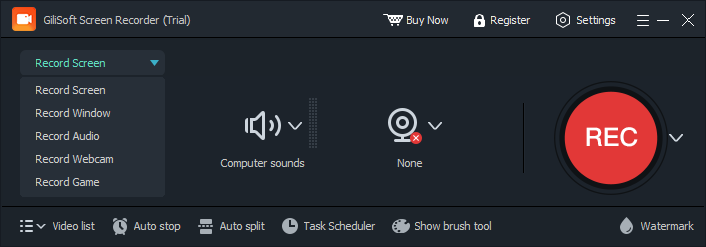 Select the full screen, a region, or an application window
Record screen, webcam, system sound, and microphone
Choose the sources that match the lesson, meeting, product demonstration, reaction video, or webcam presentation you are recording.
Build the right source combination
- Select the screen or application capture target.
- Enable webcam when the presenter should appear with the screen.
- Choose system sound for application, browser, meeting, or media playback audio.
- Choose microphone for narration, commentary, or the presenter voice.
- Use both sources when screen activity and spoken explanation must stay synchronized.
- Watch the input indicators and make a short test before the full recording.
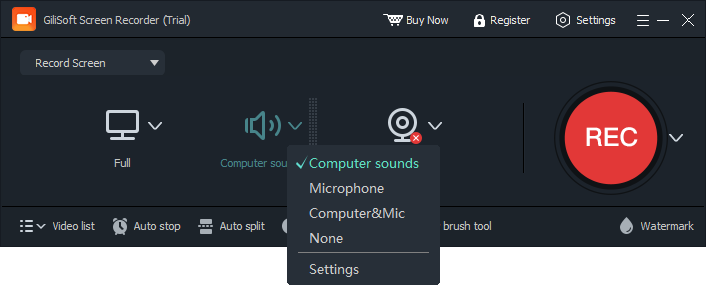 Select the audio and webcam inputs before recording
 Use webcam beauty and skin smoothing for presenter video
 Remove the webcam background or use a virtual background or green screen
Recording controls for clearer captures
Guide attention while the recording is in progress
- Use the drawing controls to mark, highlight, or point to important areas.
- Enable cursor visibility and click effects when viewers need to follow mouse actions.
- Add a visible text or image watermark when ownership or context should remain on the recording.
- Use recording hotkeys to start, pause, resume, or stop without opening the main window.
- Use zoom while recording when a small interface area needs closer attention.
- Capture snapshots when a still image is needed alongside the video.
 Use on-screen drawing tools to emphasize important actions
Cursor and click effects
Keep the pointer visible and make mouse clicks easier to follow in software demonstrations and training videos.
Visible watermark
Add text or an image mark to recorded output for ownership, department labels, or project context.
Recording hotkeys
Control recording without repeatedly returning to the main application window.
Zoom while recording
Magnify the cursor area when small controls, menus, or text need to remain readable.
Snapshots
Save still images during capture for documentation, handouts, support notes, or thumbnails.
Pause and resume
Temporarily stop capture without ending the current recording file.
Schedule, stop, and split recordings automatically
Automation is useful for webinars, recurring sessions, unattended capture, and long recordings that should not become one oversized file.
Create a scheduled recording task
- Open Task Scheduler from Screen Recorder.
- Choose the recording target and source settings.
- Set the date and start time.
- Choose the recording duration or stopping condition.
- Confirm the output folder and save the task.
- Leave the computer and required source application ready before the scheduled time.
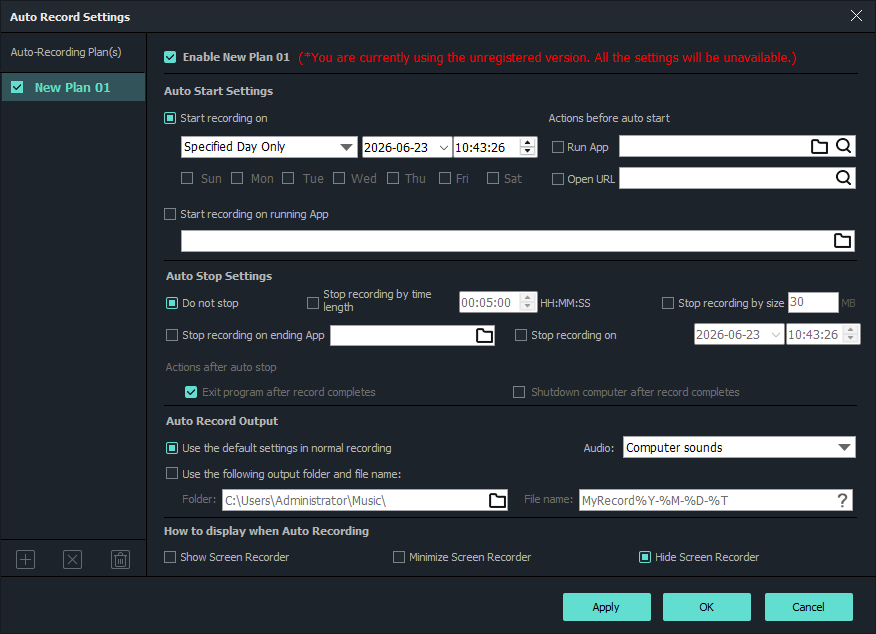 Configure unattended or recurring recording tasks
 Stop automatically by duration, time, or file-size condition
 Split long recordings by time or file size
Recording quality, format, and output settings
Balance clarity, frame rate, and file size according to the screen content and the computer being used.
 Choose MP4, AVI, WMV, or FLV and adjust quality, size, and frame rate
 Review capture behavior and H.264 GPU hardware encoding options
 Set the recording audio source and quality
Use H.264 GPU hardware encoding when supported by the computer. For low-end PCs, reduce the recording resolution or frame rate and close unnecessary applications before capture.
Review and manage recorded files
Check the result before sharing
- Open the recorded-file list after stopping capture.
- Play the beginning and confirm the selected region is correct.
- Check system sound, microphone, and webcam synchronization.
- Inspect sections with cursor effects, annotations, zoom, or watermarks.
- Confirm that automatic splitting created complete sequential files.
- Rename or move verified recordings into the correct project folder.
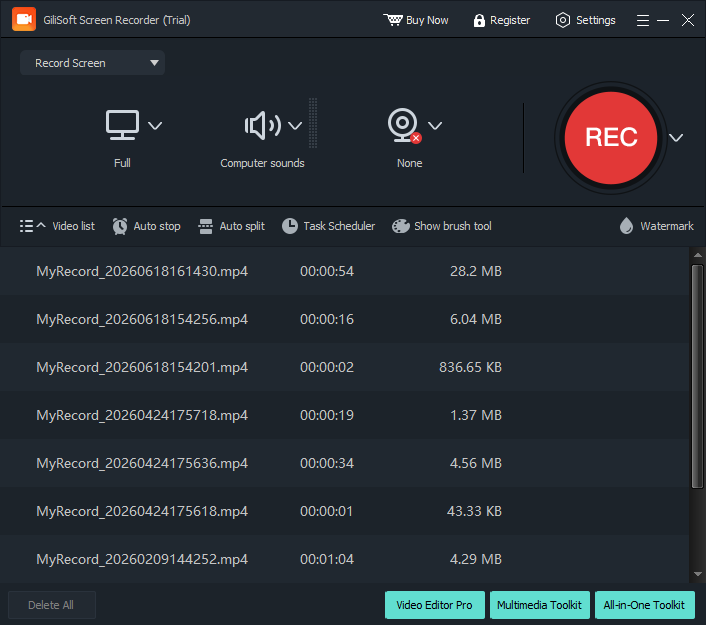 Open and review saved recordings from the file list
Final recording checklist
Target
The intended screen, region, application, or webcam is selected.
Audio
System sound and microphone inputs were tested.
Privacy
Notifications and unrelated private windows are hidden.
Automation
Schedule, auto-stop, and auto-split conditions are correct.
Output
The format, quality, and destination folder are confirmed.
Verification
A short test recording plays with clear video and synchronized audio.
Screen Recorder troubleshooting and FAQ
Why is system audio missing?
Open the audio source settings and select computer or system sound. Confirm that the application is producing sound and is not muted in the Windows volume mixer.
Why is the microphone too quiet?
Select the correct microphone, increase its Windows input level, move closer to it, and make a short test while watching the input indicator.
Why is the webcam unavailable?
Close other applications using the camera, allow camera access in Windows privacy settings, then reopen Screen Recorder and select the webcam again.
Why is the recording file too large?
Reduce resolution, frame rate, or quality, choose H.264 output, and enable automatic splitting for long sessions.
Why does recording lag on a low-end PC?
Close unnecessary applications, lower resolution or frame rate, enable supported GPU encoding, and record only the required screen region.
How do I edit or join recordings afterward?
This guide focuses on capture. For trimming, joining, conversion, and broader post-recording preparation, use GiliSoft Screen Recorder Pro.
Record Windows screen, webcam, and audio with practical controls
Use GiliSoft Screen Recorder for lessons, meetings, demonstrations, support videos, scheduled capture, and everyday screen recording on Windows.


