GiliSoft Audio Editor User Guide

How to Cut, Join, Record, and Edit Audio on Windows

Follow the actual GiliSoft Audio Editor workflow to select precise waveform ranges, split or trim recordings, join clips in order, mix narration with music, and export a finished audio file.

Cut and split audioJoin and mix tracksRecord audioFade and volume effects
Audio waveform cutting, joining, recording, and fade tools in GiliSoft Audio Editor

Choose the right audio editing task

The commands solve different problems. Decide what the finished audio should sound like before changing the waveform.

Cut or trim

Remove silence, mistakes, or an unwanted range, or keep only one selected part of a recording.

Split

Export selected ranges as separate files when a long recording needs chapters, clips, or ringtone sections.

Join

Place complete clips one after another to create one continuous file in the required playback order.

Mix

Layer narration, music, or another sound so two audio sources play at the same time.

Keep the original source file. Preview a few seconds before and after each edit, then use MP3 for convenient sharing or WAV when you need a less compressed working file.

1. Open Audio Editor and import the source

Start from the waveform editing workspace

  1. Open GiliSoft Audio Editor.
  2. Choose the audio editing task from the main workspace.
  3. Add the music, recording, voice clip, or other supported audio file.
  4. Wait for the waveform to appear.
  5. Play the file and identify the section that needs editing.
  6. Zoom or move through the timeline before making a precise selection.

The waveform is the main editing reference. Use it together with playback rather than relying only on the visible peaks.

GiliSoft Audio Editor waveform editing workspaceOpen the updated waveform workspace before selecting an audio range

2. Cut, trim, or export part of an audio file

Select the exact waveform range you want

  1. Play the audio and locate the beginning of the required section.
  2. Drag across the waveform to select the range.
  3. Preview the selection and adjust its start or end point.
  4. Delete an unwanted range, or keep the selected range when trimming the surrounding audio.
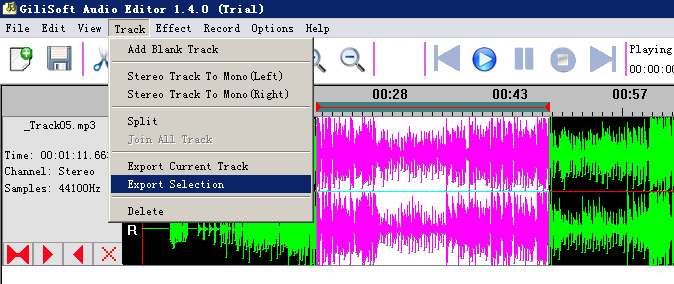
  5. Choose Export Selection when only the selected clip should become a new file.
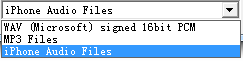
  6. Choose the output format and save the result.

This process works for music excerpts, voice clips, ringtone sections, interview highlights, and removing silence or mistakes.
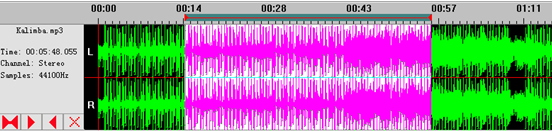
Select an audio waveform range for cutting or trimmingSelect and preview the exact audio range before cutting
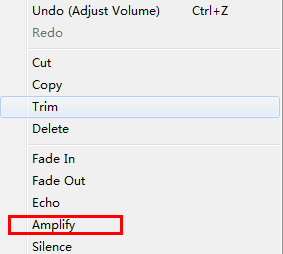
3. Adjust volume or amplify a quiet section

Apply volume changes only where they are needed

  1. Select the complete track for a global change, or select one waveform range for a local correction.
  2. Open the context menu for the selected audio.
  3. Choose Amplify or the applicable volume command.
  4. Set a moderate adjustment first.
  5. Preview the loudest and quietest points.
  6. Undo and reduce the adjustment if the audio clips or becomes harsh.
Amplification raises the selected signal, including any background noise already present. Use smaller changes and listen before exporting.
Choose Amplify for a selected audio rangeOpen the editing command for the selected waveform range

4. Add fade in and fade out

Create smoother openings and endings

  1. Select a short range at the beginning of the audio.
  2. Open the editing menu and apply Fade In.
  3. Select a short range at the end of the audio.
  4. Apply Fade Out.
  5. Play through both transitions.
  6. Shorten or lengthen the selected ranges when the fades feel too sudden or too slow.

Fade effects are useful for songs, podcast clips, narration, lessons, ringtone excerpts, and any audio that should enter or end less abruptly.
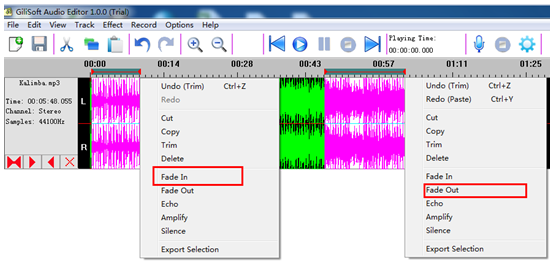
Apply fade in and fade out to selected audioApply fades to selected ranges at the beginning and end

5. Join multiple audio files in sequence

Place complete tracks one after another

  1. Import the first audio file.
  2. Add the next file or files in the intended playback order.
  3. Review the beginning and ending of each track.
  4. Open Track and choose Join All Track.
  5. Enter the output file name and choose the destination.
  6. Open the joined result and listen at every connection point.

Joining is the right choice when one clip should begin after another, such as chapters, lesson sections, interview segments, or music compilations.
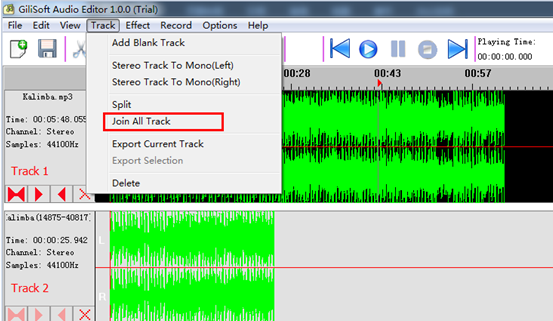
Join multiple audio tracks in GiliSoft Audio EditorJoin all imported tracks into one sequential audio file

6. Mix narration, music, or another audio file

Layer another sound over the selected section

  1. Import the main audio file.
  2. Select the timeline range where the second sound should play.
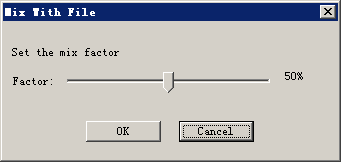
  3. Choose Edit, then Mix With File.
  4. Select the second audio file.
  5. Set the mix factor so speech and music remain balanced.
  6. Preview the start, middle, and end of the mixed section before exporting.

Mixing is different from joining: both sounds play together instead of one after another.
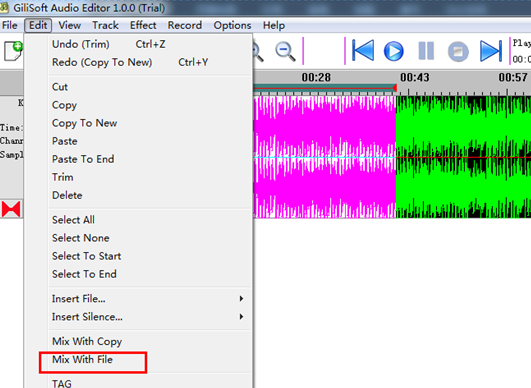
Mix another audio file with a selected waveform rangeChoose the second file and place it over the selected range

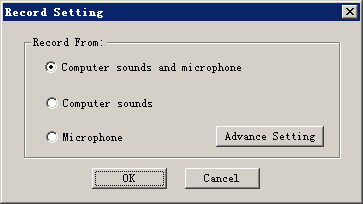
7. Record audio and edit it immediately

Choose the recording source before starting

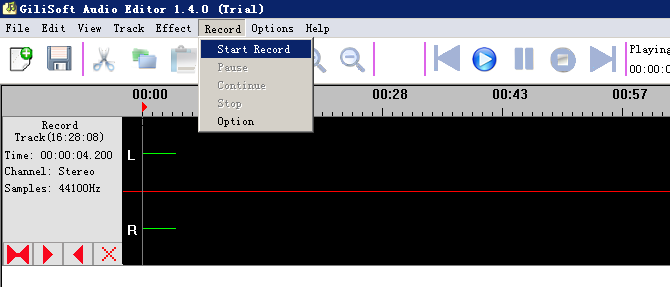
  1. Open Record and choose Option.
  2. Select the recording mode that matches the source.
  3. Confirm the input device and level.
  4. Start recording.
  5. Stop when the required sound is complete.
  6. Play the new recording, trim silence or mistakes, and export it.

Use the available recording modes for system audio, microphone narration, or the appropriate source supported by the current setup.

Configure recording options in GiliSoft Audio EditorChoose the recording source and related settings

8. Add microphone narration over music

Record the voice, then mix it with the music track

  1. Import the music file.
  2. Set the recording mode to microphone.
  3. Play the music while recording the narration at the intended timing.
  4. Stop and review the recorded voice track.
  5. Select and copy the required narration range.
  6. Choose Edit, then Mix With Copy, and adjust the mix factor.

Listen on headphones and ordinary speakers to confirm that the narration remains clear without making the music unnaturally quiet.
Record narration before mixing it with musicRecord the microphone track before mixing it with the source music

9. Export and verify the finished audio

Save a new file and listen to the complete result

  1. Choose whether to export the complete track or only the selected range.
  2. Select MP3, WAV, or another suitable available format.
  3. Choose a clear file name and destination.
  4. Set the output options required by the project.
  5. Start the export and wait for it to finish.
  6. Open the new file outside Audio Editor and listen through every cut, join, mix, fade, and volume change.

Keep the editable source until the exported file has been checked on the device or platform where it will be used.
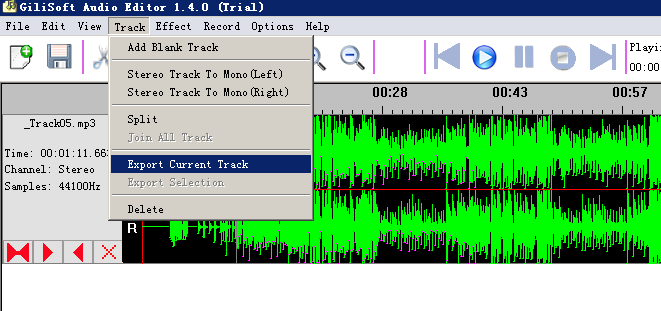
Export the finished audio from GiliSoft Audio EditorChoose the output file settings and save the finished audio

Final audio editing checklist

SourceThe original audio remains available if another edit is needed.
Cut pointsNo word, note, or transient is clipped at the edited boundaries.
Track orderJoined clips play in the intended sequence.
BalanceNarration, music, and mixed audio remain clear at normal volume.
EffectsFades and amplification sound natural without clipping.
OutputThe exported file opens, plays completely, and uses the required format.

Audio Editor troubleshooting and FAQ

What is the difference between joining and mixing?

Joining places tracks one after another. Mixing layers one sound over another so both can play at the same time.

Why does a cut sound abrupt?

Move the cut point to a quieter waveform position, preview both sides, or apply a short fade when the transition should be smoother.

Why is amplified audio distorted?

The gain may be too high. Undo the change, apply a smaller amplification amount, and preview the loudest section again.

Why is narration difficult to hear?

Reduce the music contribution in the mix, increase the narration moderately, and check that the microphone recording itself is clear.

Can I export only one selected section?

Yes. Select the waveform range and use Export Selection to save that part as a new file.

Should I edit MP3 or WAV?

MP3 is convenient for sharing, while WAV is often preferable as an intermediate working file when avoiding another lossy compression step matters.

Cut, join, record, and finish audio in one Windows editor

Use GiliSoft Audio Editor for waveform cutting, selected-range export, track joining, audio mixing, recording, fades, volume adjustment, and practical MP3 or WAV output.

Download TrialView Audio Editor
×Expanded Audio Editor workspace screenshot
×Expanded add audio screenshot
×Expanded audio selection screenshot
×Expanded Export Selection screenshot
×Expanded clipped audio output screenshot
×Expanded volume command screenshot
×Expanded amplification settings screenshot
×Expanded fade effect screenshot
×Expanded join audio screenshot
×Expanded Mix With File screenshot
×Expanded audio mix factor screenshot
×Expanded audio recording settings screenshot
×Expanded audio recording mode screenshot
×Expanded audio recording screenshot
×Expanded narration recording screenshot
×Expanded audio export screenshot